When struggling to remove a stubborn virus on Mac, some users wonder if a factory reset can help, so here is the lowdown on this matter.
Is a factory reset worthwhile to remove Mac viruses?
With Mac computers being increasingly struck by malware and other threats, attack prevention has come to the fore. This includes, first and foremost, staying away from suspicious downloads, knowing how to identify phishing scams, taking macOS updates seriously, and ignoring pop-ups on web pages that report security problems or contain offers that look too good to be true. However, no user is 100% vigilant and no system in existence is immune to exploitation. It means that infections happen, and at some point anyone – even the most security-minded security person out there – may be faced with the challenge of purging their devices of malicious code. The silver lining is that most malware species and viruses can be detected and removed by traditional means, such as the manual cleanup of toxic files or the use of a trusted automatic tool. In rare cases, though, none of this appears to do the trick, and users consider more complex disinfection options like a factory reset.
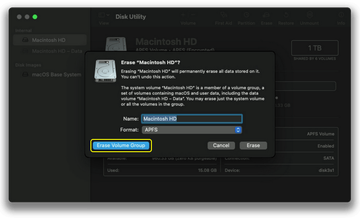
Since this procedure wipes all data stored on disk volumes, it seems that the bad stuff will vanish alongside everything else. Indeed, that’s what usually happens in the case of malware that doesn’t employ super-sophisticated evasion and persistence mechanisms. If you are dealing with adware, malware, or scareware that won’t succumb to normal threat obliteration techniques, a factory reset is almost certainly going to be helpful. Of course, no sane person will decide to erase their Mac because of a garden-variety browser hijacker that can be defeated by removing a handful of files, eliminating a rogue device profile under System Preferences, and re-entering the correct browser customizations. This creates disproportionately serious inconveniences that involve the need to transfer back all personal information, reinstall macOS, and download the necessary apps from scratch. But in predicaments where nothing else works, restoring a machine to factory settings is the lesser of two evils. Still, even this thoroughgoing approach may not guarantee a successful outcome in a few marginal situations.
Therefore, it is recommended to download Combo Cleaner and scan your system for these stubborn files. This way, you may reduce the cleanup time from hours to minutes.
Download Now Learn how Combo Cleaner works. If the utility spots malicious code, you will need to buy a license to get rid of it.Can viruses survive a factory reset?
As a general rule, no. Erasing a Mac is like a scorched-earth tactic that wipes all information on disk – both useful and malign. Nevertheless, some pests are designed with a focus on persistence, which makes them incredibly hard to pinpoint and expel. One example is a rootkit, a harmful application that gives its author privileged access to the plagued system by maintaining a grip on deep, root-level macOS areas restricted from regular user interaction. Such a culprit doesn’t drop components that the victim could spot and delete from folders like Applications, LaunchAgents, or LaunchDaemons. Obviously, this quirk is a serious obstacle to tidying up the computer.
A reset is also ineffective if a virus infiltrates a system’s recovery partition that harbors the factory settings. This way, the baddie stays intact and re-infects the Mac afterwards. Another no-go scenario kicks in when the backup storage has malware or an executable that automatically downloads a malicious application from a remote server.
The Mac factory reset process, in a nutshell
First things first, be sure to back up your Mac using Time Machine before erasing it. To reset an Intel-based Mac to its factory state, open the macOS Recovery interface by pressing the Command (⌘) and R keys simultaneously right after turning on your computer. When a screen with the available options appears, click on Disk Utility, select Macintosh HD in the left-hand pane (the name of the startup disk may vary if you changed it previously), specify the format (keep the one recommended by Disk Utility), and click Erase Volume Group or Erase on the dialog, as illustrated in the screenshot above. When the factory reset is completed, close Disk Utility, select Reinstall macOS on the utilities screen, and follow further prompts to install a fresh copy of the operating system.
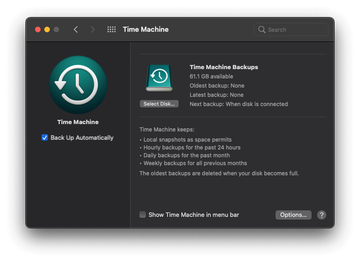
A reset is easier to complete if you own a Mac with Apple silicon or the T2 chip on board that’s running macOS Monterey and later. Just open System Preferences (now renamed “System Settings” in macOS Ventura), find the option called Erase All Content and Settings, and follow on-screen instructions that are thankfully quite intuitive. Again, don’t forget to back up your data and settings with Time Machine before getting down to the process.
Make sure a factory reset is not a waste of time
If you are up to erasing your Mac as a way to remove a stubborn virus or malware, take a break for a moment and think whether or not you are overreacting. It’s always better to take a shortcut than go the extra mile. Not only does resetting the computer wipe all data, media, and settings, but it also signs you out of Apple ID, removes biometric information for Touch ID, and unpairs all wirelessly connected accessories. It means that a lot of customization work will be on your to-do list, too. You’ll also have to reinstall macOS. This is a lengthy enterprise, and you never know when it may go haywire due to a bug or your Internet connection being interrupted all of a sudden. Moreover, you may end up with an older version of the operating system that came with your computer – possibly Mac OS X for “aging” models. This adds a time-consuming upgrade to your original plan.
Keep in mind that a factory reset and its aftermath are tedious. There are plenty of much simpler methods to vanquish dangerous code, so try them first. For instance, you can check your LaunchAgents, LaunchDaemons, and Application Support directories for recently added suspicious .plist files and delete the ones that have nothing to do with Apple products or software you knowingly installed. Also, open Login Items and Profiles (if listed under System Preferences) and disable sketchy processes. Go over the Applications screen and try to identify a rogue entry that should be moved to the Trash. If your web browser is affected, check the extensions list for objects you don’t recognize and remove them. These easy steps work like a charm in most infection scenarios. In case you run into hurdles along the way, there’s also the option to run a scan with a security app that detects prevalent Mac threats and spots emerging viruses based on their behavior. Don’t rush headlong into factory resetting your Mac until you have tried these classic methods. Start with the following steps and then make a rational decision.
Manual virus removal for Mac
The steps listed below will walk you through the removal of this malicious application. Be sure to follow the instructions in the specified order.
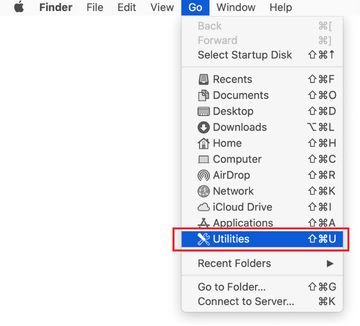
Expand the Go menu in your Mac’s Finder bar and select Utilities as shown below.
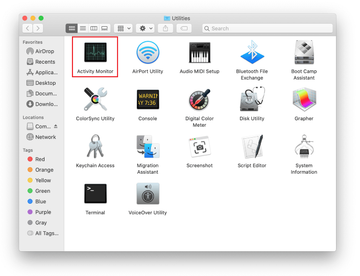
Locate the Activity Monitor icon on the Utilities screen and double-click on it.
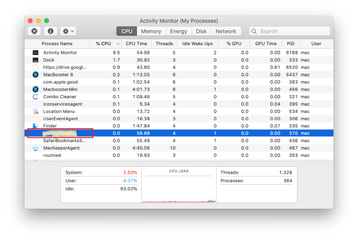
In the Activity Monitor app, look for a process that appears suspicious. To narrow down your search, focus on unfamiliar resource-intensive entries on the list. Keep in mind that its name isn’t necessarily related to the way the threat is manifesting itself, so you’ll need to trust your own judgement. If you pinpoint the culprit, select it and click on the Stop icon in the upper left-hand corner of the screen.
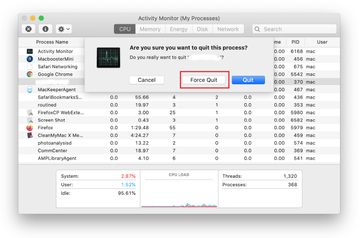
When a follow-up dialog pops up asking if you are sure you want to quit the troublemaking process, select the Force Quit option.
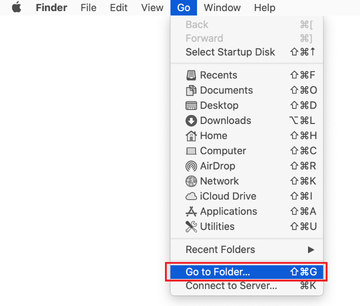
Click on the Go menu icon in the Finder again and select Go to Folder. You can as well use the Command-Shift-G keyboard shortcut.
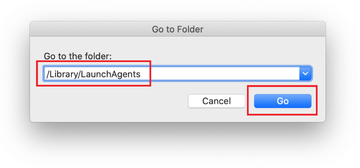
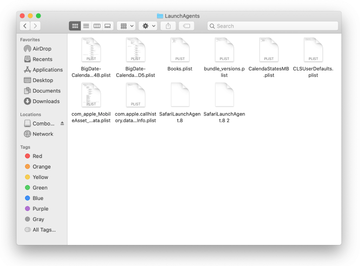
Type /Library/LaunchAgents in the folder search dialog and click on the Go button.
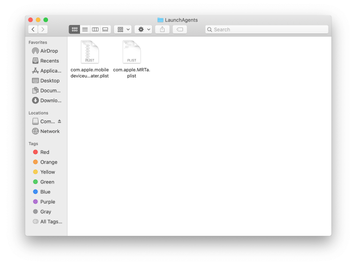
Examine the contents of the LaunchAgents folder for dubious-looking items. Be advised that the names of files spawned by malware may give no clear clues that they are malicious, so you should look for recently added entities that appear to deviate from the norm.
As an illustration, here are several examples of LaunchAgents related to mainstream Mac infections: com.updater.mcy.plist, com.avickUpd.plist, and com.msp.agent.plist. If you spot files that don’t belong on the list, go ahead and drag them to the Trash.
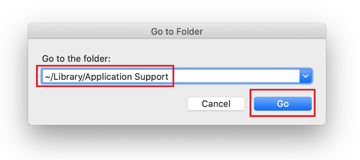
Use the Go to Folder lookup feature again to navigate to the folder named ~/Library/Application Support (note the tilde symbol prepended to the path).
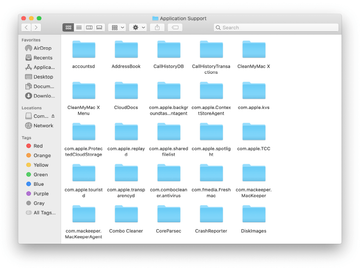
When the Application Support directory is opened, identify recently generated suspicious folders in it and send them to the Trash. A quick tip is to look for items whose names have nothing to do with Apple products or apps you knowingly installed. A few examples of known-malicious folder names are UtilityParze, ProgressSite and IdeaShared.
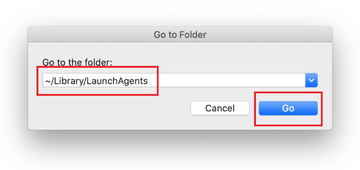
Enter ~/Library/LaunchAgents string (don’t forget to include the tilde character) in the Go to Folder search area.
The system will display LaunchAgents residing in the current user’s Home directory. Look for dodgy items related to the virus (see logic highlighted in subsections above) and drag the suspects to the Trash.
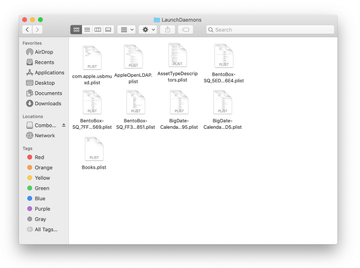
Type /Library/LaunchDaemons in the Go to Folder search field.
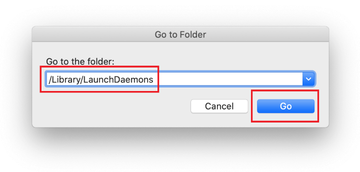
In the LaunchDaemons path, try to pinpoint the files the malware is using for persistence. Several examples of such items cropped by Mac infections are com.pplauncher.plist, com.startup.plist, and com.ExpertModuleSearchDaemon.plist. Delete the sketchy files immediately.
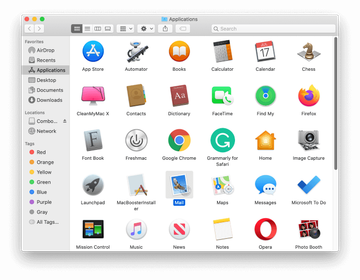
Click on the Go menu icon in your Mac’s Finder and select Applications on the list.
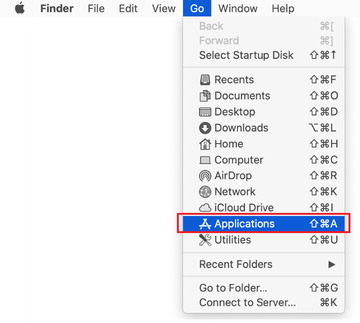
Find an app that clearly doesn’t belong there and move it to the Trash. If this action requires your admin password for confirmation, go ahead and enter it.
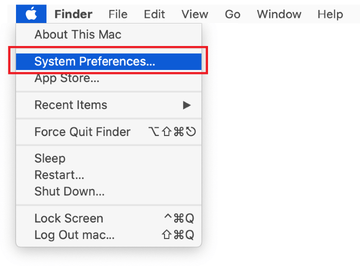
Expand the Apple menu and select System Preferences.
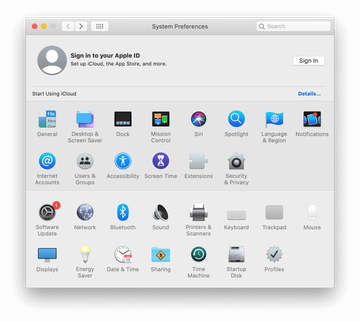
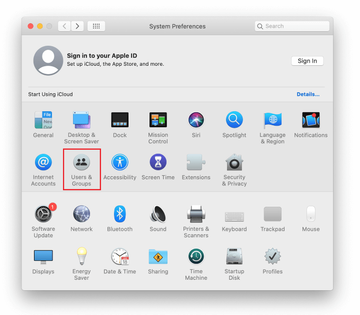
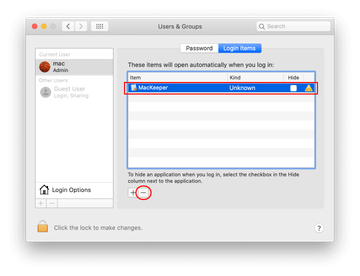
Proceed to Users & Groups and click on the Login Items tab.
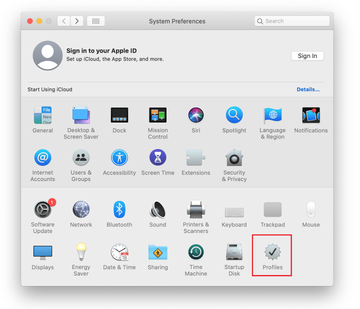
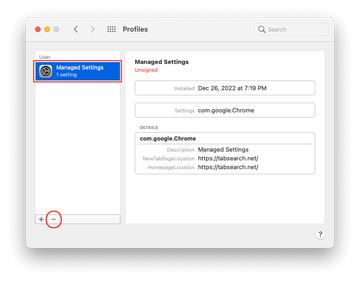
Now select Profiles under System Preferences. Look for a malicious item in the left-hand sidebar. Several examples of configuration profiles created by Mac adware include TechSignalSearch, MainSearchPlatform, AdminPrefs and Safari Preferences. Select the offending entity and click on the minus sign at the bottom to eliminate it.
Get rid of a virus in web browser on Mac
TTo begin with, the web browser settings taken over by a virus should be restored to their default values. Although this will clear most of your customizations, web surfing history, and all temporary data stored by websites, the malicious interference should be terminated likewise. The overview of the steps for completing this procedure is as follows:
- Remove a virus in Safari
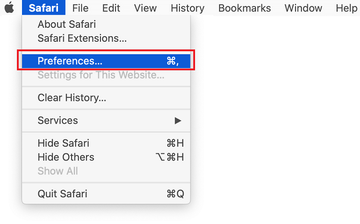
- Open the browser and go to Safari menu. Select Preferences in the drop-down list.
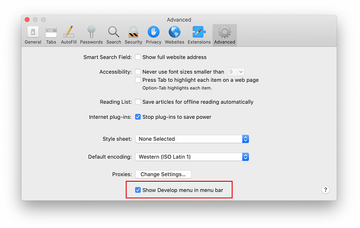
- Once the Preferences screen appears, click on the Advanced tab and enable the option saying “Show Develop menu in menu bar”.
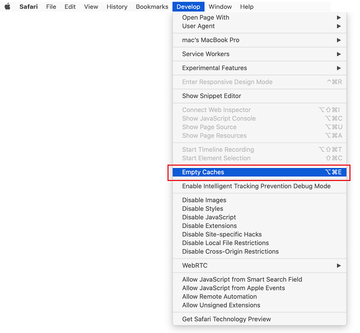
- Now that the Develop entry has been added to the Safari menu, expand it and click on Empty Caches.
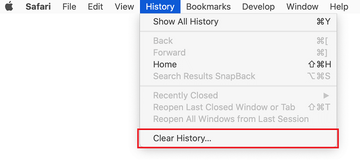
- Now select History in the Safari menu and click on Clear History in the drop-down list.
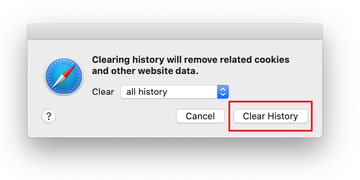
- Safari will display a dialog asking you to specify the period of time this action will apply to. Select all history to ensure a maximum effect. Click on the Clear History button to confirm and exit.
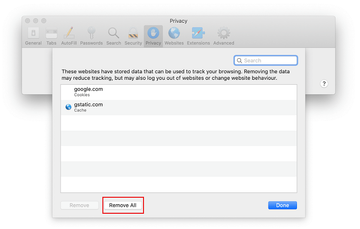
- Go back to the Safari Preferences and hit the Privacy tab at the top. Find the option that says Manage Website Data and click on it.

- The browser will display a follow-up screen listing the websites that have stored data about your Internet activities. This dialog additionally includes a brief description of what the removal does: you may be logged out of some services and encounter other changes of website behavior after the procedure. If you’re okay with that, go ahead and click on the Remove All button.
- Restart Safari
- Open the browser and go to Safari menu. Select Preferences in the drop-down list.
- Remove malware from Chrome
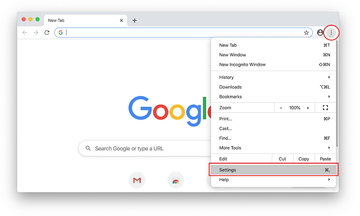
- Open Chrome, click the Customize and control Google Chrome (⁝) icon in the top right-hand part of the window, and select Settings in the drop-down
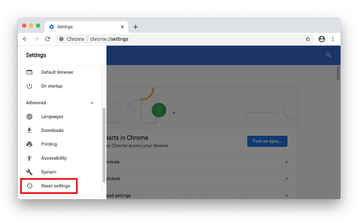
- When on the Settings pane, select Advanced
- Scroll down to the Reset settings section.
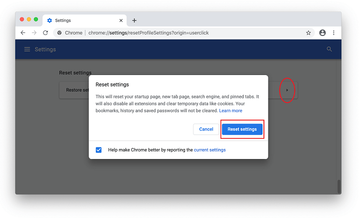
- Confirm the Chrome reset on a dialog that will pop up. When the procedure is completed, relaunch the browser and check it for malware activity.
- Open Chrome, click the Customize and control Google Chrome (⁝) icon in the top right-hand part of the window, and select Settings in the drop-down
- Remove viruses in Mozilla Firefox
- Open Firefox and go to Help – Troubleshooting Information (or type about:support in the URL bar and press Enter).
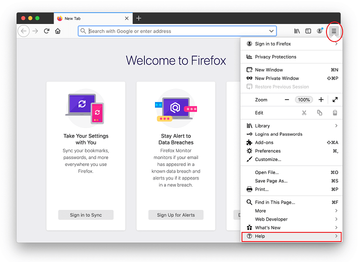
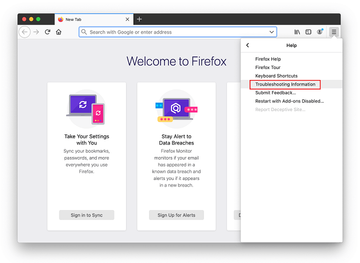
- When on the Troubleshooting Information screen, click on the Refresh Firefox button.
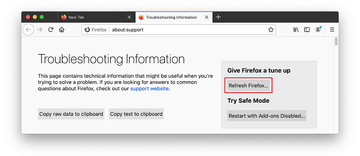
- Confirm the intended changes and restart Firefox.
- Open Firefox and go to Help – Troubleshooting Information (or type about:support in the URL bar and press Enter).
Scan your Mac for viruses using Combo Cleaner
The Mac maintenance and security app called Combo Cleaner is a one-stop tool to detect and remove factory reset virus. This technique has substantial benefits over manual cleanup, because the utility gets hourly virus definition updates and can accurately spot even the newest Mac infections.
Furthermore, the automatic solution will find the core files of the malware deep down the system structure, which might otherwise be a challenge to locate. Here’s a walkthrough to sort out the factory reset issue using Combo Cleaner:
Download Combo Cleaner installer. When done, double-click the combocleaner.dmg file and follow the prompts to install the tool onto your Mac.
By downloading any applications recommended on this website you agree to our Terms and Conditions and Privacy Policy. The free scanner checks whether your Mac is infected. To get rid of malware, you need to purchase the Premium version of Combo Cleaner.
Open the app from your Launchpad and let it run an update of the malware signature database to make sure it can identify the latest threats.
Click the Start Combo Scan button to check your Mac for malicious activity as well as performance issues.
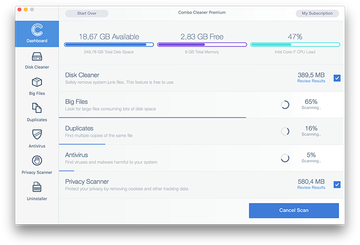
Examine the scan results. If the report says “No Threats”, then you are on the right track with the manual cleaning and can safely proceed to tidy up the web browser that may continue to act up due to the after-effects of the malware attack (see instructions above).
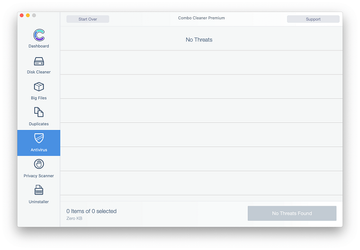
In case Combo Cleaner has detected malicious code, click the Remove Selected Items button and have the utility remove factory reset threat along with any other viruses, PUPs (potentially unwanted programs), or junk files that don’t belong on your Mac.
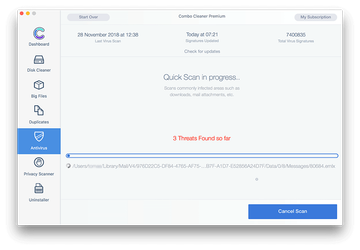
Once you have made doubly sure that the malicious app is uninstalled, the browser-level troubleshooting might still be on your to-do list. If your preferred browser is affected, resort to the previous section of this tutorial to revert to hassle-free web surfing.
