Removing Landslide Search engine may end up on a Mac user’s to-do list because it triggers browser redirect activity and uses unethical distribution techniques.
Update:
The current state of the web search industry is definitely enough to meet the expectations of the modern user. The information lookup process via popular services is amazingly fast and convenient, and the plethora of data returned for any query is surplus to regular requirements. With that said, small companies that purport to further improve one’s search experience appear to make hollow promises. This speculation is probably a trivial thing for the authors of the Landslide Search app for Mac. It is marketed as an awesome instrument to generate refined search results, plus there are no money strings attached as the solution is “free for life”. Behind all of this alleged beauty, though, there are pitfalls untold on the tool’s website but they make themselves felt at every stage of the software propagation and real-world deployment.
The first obvious concern is that the installation of Landslide Search is very rarely an upshot of informed decision. Users mostly discover it on their Macs without having knowingly authorized its setup. This inconsistency has a name – bundling. The truth is, the app in question tends to leverage an opportunistic approach in terms of propagation. It clings to other software in such a way that people believe they are about to install one thing but shortly realize that more programs have infiltrated their systems in the same package. Installing freeware offered on unofficial software repositories can be like buying a pig in a poke these days. In some scenarios, the default structure of such a setup is pre-loaded with extras that aren’t visible unless the user digs deeper in the options to customize the whole process. Anyway, this is how the Landslide Search app usually arrives at Macs. Not the most white-hat method imaginable, really.
Landslide Search may re-infect your Mac multiple times unless you delete all of its fragments, including hidden ones. Therefore, it is recommended to download Combo Cleaner and scan your system for these stubborn files. This way, you may reduce the cleanup time from hours to minutes.
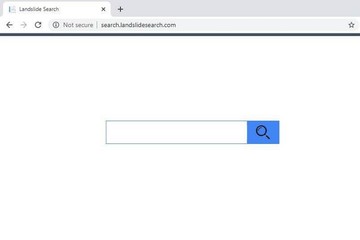
Download Now Learn how Combo Cleaner works. If the utility spots malicious code, you will need to buy a license to get rid of it.Malicious characteristics of this application continue to take shape when it’s already inside a host. The victim’s preferred web browser is the pivot point of this adverse influence. The Landslide Search extension is instantly added to Safari, Chrome, or Firefox, the admin being unaware of this event. The add-on appropriates a good deal of control in the tainted browser, which results in a takeover of default settings such as the preferred search engine, homepage, and new tab site. Once this is done, the user will be unable to define their search settings. The superimposed configuration will cause permanent redirects to search.landslidesearch.com page, which appears to be the core element of this controversial service. A little bit of exploring its functionality completely dispels the whole promotion story behind Landslide Search. Instead of delivering a higher level of Internet search efficiency, it simply takes your keyword and forwards it to Yahoo Search – that’s it.
While at their wit’s end trying to fix the issue, the victims discover that their homepage and default search settings in the affected web browser are either blank or actually contain the rogue URL but don’t allow any manual edits because the fields are grayed out. At first sight, this seems to be an insurmountable obstacle hampering the process of reverting to the correct settings. Luckily, there is a trivial workaround that only takes a minute to complete and eliminates a good deal of the infection’s persistence. It turns out that Landslide Search hijacker installs a new device profile that controls, among other things, the web browsing facet of Mac usage. It is listed in the Profiles screen under System Preferences. Just look for an entry you don’t recognize, select the suspect, and click the minus button at the bottom to purge it. This will ease the grip of the malware and will re-enable the regular options to put configuration tweaks into effect.
At the end of the day, the solution turns out to be a primitive redistribution entity that seizes one’s online traffic and sends it to another service. The fundamental part of this scheme is what’s happening en route. The browser silently ‘touches’ a few ad networks before getting to the destination site. Every such unique hit in transit is a commodity that can be monetized. Now that it’s clear that Landslide Search isn’t quite what it claims to be, the best response is to remove it from your Mac if it’s in. This can be more complex than uninstalling an average benign application. Keep reading to learn how to get around this roadblock.
Landslide Search engine virus manual removal for Mac
The steps listed below will walk you through the removal of this malicious application. Be sure to follow the instructions in the order specified.
- Open up the Utilities folder as shown below
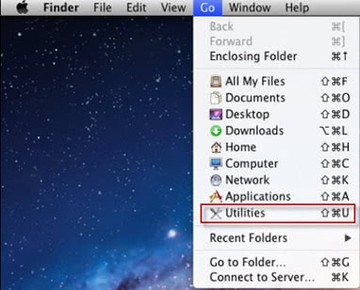
- Locate the Activity Monitor icon on the screen and double-click on it
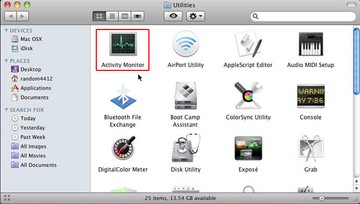
- Under Activity Monitor, find Landslide Search or some other item that appears suspicious, select it and click Quit Process
- A dialog should pop up, asking if you are sure you would like to quit the troublemaking process. Select the Force Quit option
- Click the Go button again, but this time select Applications on the list. Find the entry for Landslide Search on the interface, right-click on it and select Move to Trash. If user password is required, go ahead and enter it
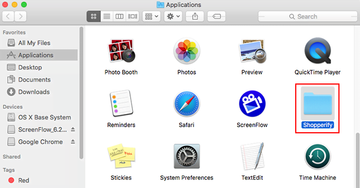
- Now go to Apple Menu and pick the System Preferences option
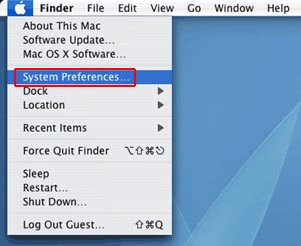
- Select Accounts and click the Login Items button. The system will come up with the list of the items that launch when the box is started up. Locate Landslide Search or other potentially unwanted app there and click on the “-“ button
Get rid of Landslide Search redirect in web browser on Mac
To begin with, the web browser settings taken over by the Landslide Search redirect virus should be restored to their default values. Although this will clear most of your customizations, web surfing history, and all temporary data stored by websites, the malicious interference should be terminated likewise. The overview of the steps for completing this procedure is as follows:
- Remove Landslide Search virus from Safari
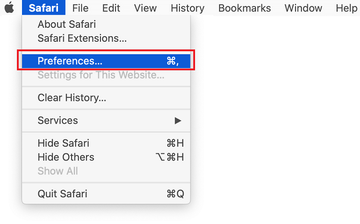
- Open the browser and go to Safari menu. Select Preferences in the drop-down list
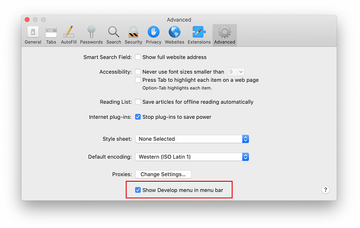
- Once the Preferences screen appears, click on the Advanced tab and enable the option saying “Show Develop menu in menu bar”.
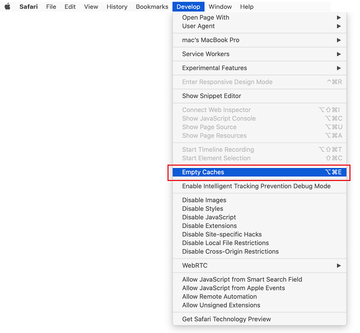
- Now that the Develop entry has been added to the Safari menu, expand it and click on Empty Caches.
- Now select History in the Safari menu and click on Clear History in the drop-down list.
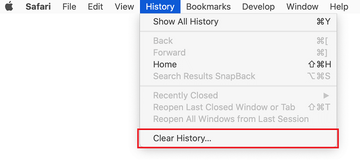
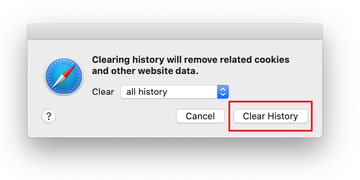
- Safari will display a dialog asking you to specify the period of time this action will apply to. Select all history to ensure a maximum effect. Click on the Clear History button to confirm and exit.
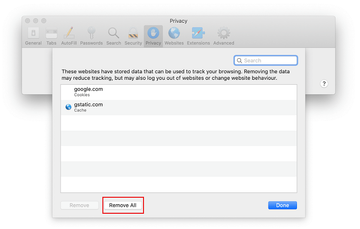
- Go back to the Safari Preferences and hit the Privacy tab at the top. Find the option that says Manage Website Data and click on it.

- The browser will display a follow-up screen listing the websites that have stored data about your Internet activities. This dialog additionally includes a brief description of what the removal does: you may be logged out of some services and encounter other changes of website behavior after the procedure. If you’re okay with that, go ahead and click on the Remove All button.
- Restart Safari
- Open the browser and go to Safari menu. Select Preferences in the drop-down list
- Remove Landslide Search redirect from Google Chrome
- Open Chrome, click the Customize and control Google Chrome (⁝) icon in the top right-hand part of the window, and select Settings in the drop-down
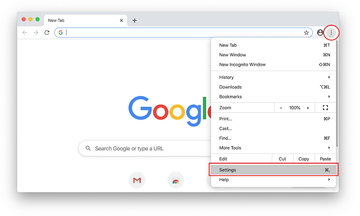
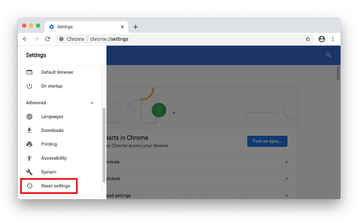
- When on the Settings pane, select Advanced
- Scroll down to the Reset settings section.
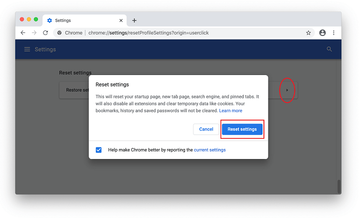
- Confirm the Chrome reset on a dialog that will pop up. When the procedure is completed, relaunch the browser and check it for malware activity.
- Open Chrome, click the Customize and control Google Chrome (⁝) icon in the top right-hand part of the window, and select Settings in the drop-down
- Remove Landslide Search redirect virus from Mozilla Firefox
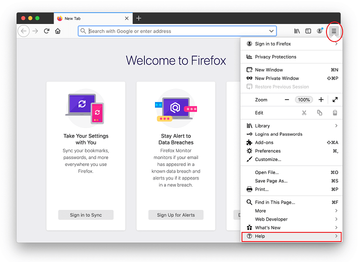
- Open Firefox and go to Help – Troubleshooting Information (or type about:support in the URL bar and press Enter).
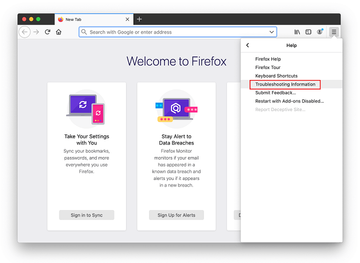
- When on the Troubleshooting Information screen, click on the Refresh Firefox button.
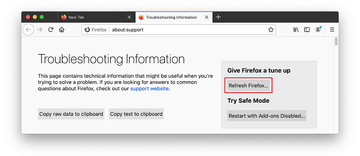
- Confirm the intended changes and restart Firefox.
- Open Firefox and go to Help – Troubleshooting Information (or type about:support in the URL bar and press Enter).
Get rid of Landslide Search virus Mac using Combo Cleaner removal tool
The Mac maintenance and security app called Combo Cleaner is a one-stop tool to detect and remove Landslide Search virus. This technique has substantial benefits over manual cleanup, because the utility gets hourly virus definition updates and can accurately spot even the newest Mac infections.
Furthermore, the automatic solution will find the core files of the malware deep down the system structure, which might otherwise be a challenge to locate. Here’s a walkthrough to sort out the Landslide Search issue using Combo Cleaner:
Download Combo Cleaner installer. When done, double-click the combocleaner.dmg file and follow the prompts to install the tool onto your Mac.
By downloading any applications recommended on this website you agree to our Terms and Conditions and Privacy Policy. The free scanner checks whether your Mac is infected. To get rid of malware, you need to purchase the Premium version of Combo Cleaner.
Open the app from your Launchpad and let it run an update of the malware signature database to make sure it can identify the latest threats.
Click the Start Combo Scan button to check your Mac for malicious activity as well as performance issues.
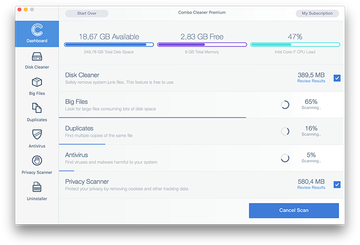
Examine the scan results. If the report says “No Threats”, then you are on the right track with the manual cleaning and can safely proceed to tidy up the web browser that may continue to act up due to the after-effects of the malware attack (see instructions above).
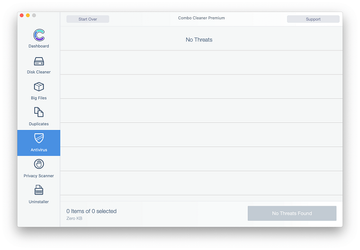
In case Combo Cleaner has detected malicious code, click the Remove Selected Items button and have the utility remove Landslide Search threat along with any other viruses, PUPs (potentially unwanted programs), or junk files that don’t belong on your Mac.
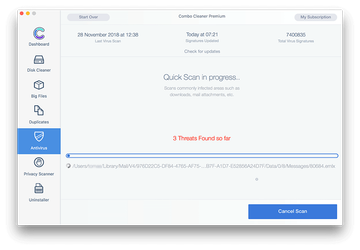
Once you have made doubly sure that the malicious app is uninstalled, the browser-level troubleshooting might still be on your to-do list. If your preferred browser is affected, resort to the previous section of this tutorial to revert to hassle-free web surfing.
