Remove Advanced Mac Cleaner rogue optimization tool from macOS to stop its frustrating alerts and undo the concomitant bad effects it calls forth.
Update:
| Threat Profile | |
|---|---|
| Name | Advanced Mac Cleaner |
| Category | Mac scareware, rogue system cleaner, PUA |
| Symptoms | Displays fake scan reports, triggers follow-up alerts pushing the licensed version, redirects browsers to junk services |
| Distribution Techniques | Freeware bundles, pirated apps, fake virus detection alerts on websites, booby-trapped software updates |
| Severity Level | Medium |
| Damage | Mac slowdown, browser takeover, personally identifiable data (PID) harvesting |
| Removal | Scan your Mac with Combo Cleaner to detect all files related to the Advanced Mac Cleaner. Use the tool to remove the infection if found. |
What is Advanced Mac Cleaner?
Advanced Mac Cleaner usually appears on Mac boxes out of the blue and floods the victim’s experience with annoying warning messages. Also known as Mac Cleaner, it dupes the user into thinking that their machine has got numerous problems hindering normal performance. According to the fake alerts, the operating system’s productivity is impacted by junk files, duplicate objects, unneeded login items, crammed up cache, trash and logs, as well as rogue apps that are claimed to occupy excessive hard disk space and thus reduce the processing speed as well as responsiveness to commands. The number of these wrongfully reported items is flagrant, going over 1000 even on a well-tuned or new Mac computer.

Distribution schemes and ties with other Mac threats
It’s not a commonplace distribution practice that’s leveraged by Advanced Mac Cleaner makers to promote their nasty brainchild. A great deal of infected users have caught this pseudo optimizer when installing free tools such as FileZilla or updating Adobe Flash Player via downloads from unofficial sources. In these cases, the setup wizard prompts you that an extra applet will be installed as a bonus to make the Mac run smoother. Some people are prudent enough to avoid such offers, which are generally known to deliver adware programs, but this caution doesn’t always help. Unless the bundle is manually unchecked and thus opted out of from the start, Advanced Mac Cleaner will still be installed in the background.

Furthermore, the culprit may additionally cross-promote affiliated scareware like Mac Adware Cleaner by means of prompts on its GUI. To add insult to injury, it may hijack the victim’s default web browser and redirect their traffic to landing pages pushing its licensed version or a copy of another rogue system utility, such as Mac Tonic, Mac Auto Fixer, or Advanced Mac Tuneup. The malware is also known to propagate alongside browser redirect viruses and persistent adware apps that affect the victim’s web surfing experience.
One of the notorious campaigns pushing the scareware in question relies on sketchy browser alerts that report alleged infection with a combo of 3 viruses called Tapsnake, CronDNS, and Dubfishicv. The victims are redirected to phony web pages that mimic AppleCare and insist on urgent download of Advanced Mac Cleaner to sort out the problem that isn’t there in the first place. It appears that the gang behind the rogue program in question is deploying a well-orchestrated malicious marketing campaign with a distinct flavor of social engineering.
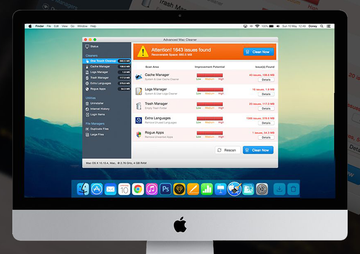
Mimicking the detection of Mac issues

The user may be unaware of this forcible setup from the get-go, but not until a message like the one above pops up. It says that a huge number of issues have been found, specifying this information as follows “Issues may include duplicate files, system & internet junk, rogue software & recoverable drive space. Fix and enjoy a performance boost.” The ‘Start Repair’ button, if clicked, takes you to the junk application’s main interface that displays high improvement potential for each cluster of problems. Obviously, cleaning the purported bugs is a paid service. At that point, it’s reasonable to contemplate over what’s happening: you are being told to pay for rectifying issues that do not exist. It’s certainly the best move to get rid of the Advanced Mac Cleaner scam rather than follow the evildoers’ recommendations.
Persistence of Advanced Mac Cleaner
To gain a foothold in a system deeply enough to make the victim’s removal efforts futile, this scareware oldie leverages a method used by many modern Mac adware strains to maintain persistence. This technique is about repurposing the configuration profiles feature. In a benign scenario, it is a powerful tool to specify the behavior of a computer or multiple machines belonging to an enterprise network. By putting it to wrong use, Advanced Mac Cleaner operators make sure the traditional edits of the browser settings are off limits for the victim and the fields for the overhauled values simply aren’t clickable. That’s because the unwelcome device profile created by the infection controls a series of important preferences to impose predefined activity, from browser redirect nuisances to fake scan screens splashing up at random.
Extra symptoms to watch out for
Another flavor of this scareware problem surfaced in October 2019. It was precipitated by a release of Apple’s macOS Catalina 10.15. After upgrading their operating system to the new version, numerous users started experiencing obnoxious popup activity with Advanced Mac Cleaner at its core. The annoying notifications say, “helperamc will damage your computer. You should move it to the Bin.” The process mentioned on these alerts is spawned by the rogue system tool under scrutiny and can be seen in the Activity Monitor, along with other related executables called “amcuninstall” and “hlpramc”.
Here is what’s happening: the latest macOS build, evidently, leverages an improved algorithm to identify potentially harmful apps. In particular, it will flag a program as a malicious one if it was installed on an unknown date, if its installer was downloaded from an unverified source, or in case some other telltale signs of sketchy activity are spotted. To let the users know about such suspicious objects, the system displays the above-mentioned popup dialogs. In this situation, the infection is probably in a dormant state and doesn’t manifest itself conspicuously. The Catalina update has simply unearthed the issue due to new security perks it delivers. Unfortunately, although the warnings include a “Move to Bin” button, it doesn’t work as intended. Therefore, the victims have to do their homework and find a way to remove Advanced Mac Cleaner despite its persistence.
Advanced Mac Cleaner manual removal for Mac
The steps listed below will walk you through the removal of this malicious application. Be sure to follow the instructions in the specified order.
Expand the Go menu in your Mac’s Finder bar and select Utilities as shown below.

Locate the Activity Monitor icon on the Utilities screen and double-click on it.

In the Activity Monitor app, look for helperamc or another process that appears suspicious. To narrow down your search, focus on unfamiliar resource-intensive entries on the list. Keep in mind that its name isn’t necessarily related to the way the threat is manifesting itself, so you’ll need to trust your own judgement. If you pinpoint the culprit, select it and click on the Stop icon in the upper left-hand corner of the screen.

When a follow-up dialog pops up asking if you are sure you want to quit the troublemaking process, select the Force Quit option.

Click on the Go menu icon in the Finder again and select Go to Folder. You can as well use the Command-Shift-G keyboard shortcut.

Type /Library/LaunchAgents in the folder search dialog and click on the Go button.

Examine the contents of the LaunchAgents folder for dubious-looking items. The objects known to be associated with Advanced Mac Cleaner are as follows: com.pcv.hlpramc.plist, com.pcv.helperamc.plist, com.pcv.amcuninstall.plist, and com.PCvark.AdvancedMacCleaner.plist.
Be advised that the names of files spawned by malware may give no clear clues that they are malicious, so you should look for recently added entities that appear to deviate from the norm. As an illustration, here are several examples of LaunchAgents related to mainstream Mac infections: com.updater.mcy.plist, com.avickUpd.plist, and com.msp.agent.plist. If you spot files that don’t belong on the list, go ahead and drag them to the Trash.

Use the Go to Folder lookup feature again to navigate to the folder named ~/Library/Application Support (note the tilde symbol prepended to the path).

When the Application Support directory is opened, identify recently generated suspicious folders in it and send them to the Trash. A quick tip is to look for items whose names have nothing to do with Apple products or apps you knowingly installed. A few examples of known-malicious folder names are Advanced Mac Cleaner, amc, SoftwareUpdater, and IdeaShared.

Enter ~/Library/LaunchAgents string (don’t forget to include the tilde character) in the Go to Folder search area.

The system will display LaunchAgents residing in the current user’s Home directory. Look for dodgy items related to Advanced Mac Cleaner virus (see logic highlighted in subsections above) and drag the suspects to the Trash.

Type /Library/LaunchDaemons in the Go to Folder search field.

In the LaunchDaemons path, try to pinpoint the files the malware is using for persistence. Several examples of such items cropped by Mac infections are com.pplauncher.plist, com.startup.plist, and com.ExpertModuleSearchDaemon.plist. Delete the sketchy files immediately.

Click on the Go menu icon in your Mac’s Finder and select Applications on the list.

Find the entry for Advanced Mac Cleaner or another app that clearly doesn’t belong there and move it to the Trash. If this action requires your admin password for confirmation, go ahead and enter it.

Expand the Apple menu and select System Preferences.


Proceed to Users & Groups and click on the Login Items tab.


Now select Profiles under System Preferences. Look for a malicious item in the left-hand sidebar. Several examples of configuration profiles created by Mac adware include TechSignalSearch, MainSearchPlatform, AdminPrefs, and Chrome Settings. Select the offending entity and click on the minus sign at the bottom to eliminate it.


Get rid of Advanced Mac Cleaner virus in web browser on Mac
To begin with, the web browser settings taken over by the Advanced Mac Cleaner virus should be restored to their default values. Although this will clear most of your customizations, web surfing history, and all temporary data stored by websites, the malicious interference should be terminated likewise. The overview of the steps for completing this procedure is as follows:
- Remove Advanced Mac Cleaner virus from Safari
Open the browser and go to Safari menu. Select Preferences in the drop-down list.

Once the Preferences screen appears, click on the Advanced tab and enable the option saying “Show Develop menu in menu bar”.

Now that the Develop entry has been added to the Safari menu, expand it and click on Empty Caches.

Now select History in the Safari menu and click on Clear History in the drop-down list.

Safari will display a dialog asking you to specify the period of time this action will apply to. Select all history to ensure a maximum effect. Click on the Clear History button to confirm and exit.

Go back to the Safari Preferences and hit the Privacy tab at the top. Find the option that says Manage Website Data and click on it.

The browser will display a follow-up screen listing the websites that have stored data about your Internet activities. This dialog additionally includes a brief description of what the removal does: you may be logged out of some services and encounter other changes of website behavior after the procedure. If you’re okay with that, go ahead and click on the Remove All button.

Restart Safari
- Remove Advanced Mac Cleaner in Google Chrome
Open Chrome, click the Customize and control Google Chrome (⁝) icon in the top right-hand part of the window, and select Settings in the drop-down

When on the Settings pane, select Advanced
Scroll down to the Reset settings section.

Confirm the Chrome reset on a dialog that will pop up. When the procedure is completed, relaunch the browser and check it for malware activity.

- Remove Advanced Mac Cleaner from Mozilla Firefox
Open Firefox and go to Help – Troubleshooting Information (or type about:support in the URL bar and press Enter).


When on the Troubleshooting Information screen, click on the Refresh Firefox button.

Confirm the intended changes and restart Firefox.
Use automatic tool to completely uninstall Advanced Mac Cleaner from your Mac
The Mac maintenance and security app called Combo Cleaner is a one-stop tool to detect and remove Advanced Mac Cleaner virus. This technique has substantial benefits over manual cleanup, because the utility gets hourly virus definition updates and can accurately spot even the newest Mac infections.
Furthermore, the automatic solution will find the core files of the malware deep down the system structure, which might otherwise be a challenge to locate. Here’s a walkthrough to sort out the Advanced Mac Cleaner issue using Combo Cleaner:
Download Combo Cleaner installer. When done, double-click the combocleaner.dmg file and follow the prompts to install the tool onto your Mac.
By downloading any applications recommended on this website you agree to our Terms and Conditions and Privacy Policy. The free scanner checks whether your Mac is infected. To get rid of malware, you need to purchase the Premium version of Combo Cleaner.
Open the app from your Launchpad and let it run an update of the malware signature database to make sure it can identify the latest threats.
Click the Start Combo Scan button to check your Mac for malicious activity as well as performance issues.

Examine the scan results. If the report says “No Threats”, then you are on the right track with the manual cleaning and can safely proceed to tidy up the web browser that may continue to act up due to the after-effects of the malware attack (see instructions above).

In case Combo Cleaner has detected malicious code, click the Remove Selected Items button and have the utility remove Advanced Mac Cleaner threat along with any other viruses, PUPs (potentially unwanted programs), or junk files that don’t belong on your Mac.

Once you have made doubly sure that the malicious app is uninstalled, the browser-level troubleshooting might still be on your to-do list. If your preferred browser is affected, resort to the previous section of this tutorial to revert to hassle-free web surfing.
FAQ
How do I remove Advanced Mac Cleaner from my MacBook Air/Pro?
Unlike benign software, Advanced Mac Cleaner is a stubborn app that attempts to complicate the uninstall process. It means that you need to circumvent its hindrance before deleting the associated components and files. This adds an extra step to the removal logic. In most cases, the following workflow does the trick:
- Open the Activity Monitor, find an entry named “helperamc”, “hlpramc” or another process with “amc” part in its name, and quit the malicious executable.
- Look for related files (com.pcv.hlpramc.plist, com.pcv.helperamc.plist, com.pcv.amcuninstall.plist, com.PCvark.AdvancedMacCleaner.plist, Advanced Mac Cleaner, amc) in the LaunchAgents and Application Support folders. Remove these objects if found.
- Go to the Finder and select Applications. Spot ‘Advanced Mac Cleaner’ app and move it to the Trash. Empty the Trash when done.
Ideally, this technique should eradicate the scareware, but with the caveat that the files may vary as new versions of Advanced Mac Cleaner appear in the wild. Stay tuned for updates in the guide above to make sure your removal efforts are effective.
What is Advanced Mac Cleaner and is it safe?
Advanced Mac Cleaner is a rogue system utility that wrongfully purports to look for and fix Mac performance issues and privacy risks. Instead of carrying through with these promises, it reports non-existent problems and tries to pressure the user into buying its licensed version to unlock the repair features. This scareware is installed behind the user’s back, usually arriving with complex app bundles camouflaged as one useful program.
At first sight, it may seem that the impact of Advanced Mac Cleaner is restricted to annoying scan reports and scary-looking popup alerts. That’s a misconception. This fake optimizer isn’t safe to use, because it can harvest your sensitive information and send it to the cybercriminals in charge of the campaign. Your usernames and passwords, as well as credit card information, are potentially at risk as long as this pest is running on your Mac.
Is Advanced Mac Cleaner legit?
No, it’s not. The huge amount of negative feedback about this program speaks volumes about its dirty practices, not to mention the obvious elements of foul play in its modus operandi. Advanced Mac Cleaner is distributed via covert software bundles and fake virus alerts shown on numerous malicious websites. Once installed, it deluges the host system with deceptive scans and popup alerts reporting hundreds or even thousands of imaginary performance and security issues. The objective of this brainwashing is to coerce the victim to purchase the app’s license, which is supposedly a prerequisite of addressing the detected threats. Another shady quirk is that Advanced Mac Cleaner is harder to uninstall than regular Mac applications. All in all, this scareware is neither legit nor safe.