Get the big picture of an ongoing pop-up scam that exploits website permissions to display Critical Virus Alert notifications on Mac computers.
What is the Critical Virus Alert Mac warning?
Apple’s increasingly effective security mechanisms introduced in the recent versions of macOS have raised the bar for malware authors in terms of the complexity of their attack styles. Direct memory access defenses, trust caches, and built-in M2 chip protections are a few examples of these extra barriers that make it difficult for malicious actors to gain a foothold in these laptops and desktops. Predictably, crooks have been busy looking for workarounds. One manifestation of thinking outside the box is the abuse of site permissions, a trick that works at the level of a web browser but affects the user experience way beyond the internet surfing side of things. The Critical Virus Alert scam, for instance, commences with a fusion of a browser redirect and social engineering, and then moves into the web push notifications territory which is too visually prominent to ignore and endure.

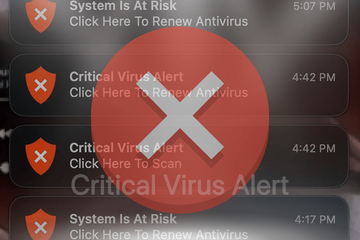
At the heart of this fraudulent activity is a series of pop-up warnings that appear in the right-hand area of the infected Mac’s desktop. They say “Critical Virus Alert – Click Here To Scan” and usually include a shield icon that attracts the victim’s attention, as if the non-stop splashing of these artifacts weren’t intrusive enough. All of those entities are clickable, leading to rogue pages that open in the default browser and give the user a heads-up about the specific threats that were allegedly detected in the system. This narrative is, obviously, a bluff underlying an attempt to wheedle out a payment for cleaning imaginary infections. An alternative scenario is to pave the way for a more dangerous strain of malware through drive-by downloads on the landing pages. Enticing people to credential phishing pages is potentially a part of the malefactors’ plan, too.
Critical Virus Alert may re-infect your Mac multiple times unless you delete all of its fragments, including hidden ones. Therefore, it is recommended to download Combo Cleaner and scan your system for these stubborn files. This way, you may reduce the cleanup time from hours to minutes.
Download Now Learn how Combo Cleaner works. If the utility spots malicious code, you will need to buy a license to get rid of it.As is the case with the now-mainstream Ask You pop-up campaign, the instances of Critical Virus Alert always co-occur with notifications that report something equally scary to make one’s anxiety accumulate. Some of the most frequently reported warnings under the same umbrella are as follows:
- “System macOS is infected! Choose an action to restore the system”
- “System Is At Risk: Click Here To Renew Antivirus”
- “Bank of America: Security alert. Someone is trying to steal $410 from your bank account”
- “Gmail alert: Account has been hacked. Your data may be stolen! Delete virus”
The common denominator across all these is that the cyber con artists in charge are pushing a “serious security problem” agenda to entice the user to make that click. Then comes a rabbit hole of manipulation that a vigilant person will immediately tell. But unfortunately, there are plenty of folks out there who fall for such trickery and don’t notice the giveaways such as poor English in the wording of some of these alerts, as well as the clearly exaggerated severity of the purported issues.

This predicament is easy to avoid as long as you take permission requests on random websites with a grain of salt. The attacks mostly start with a click on a search engine result that opens a shady page disguised as a benign and intriguing one. To be able to view the content, you’ll be prompted to allow notifications via a respective pop-up. In many cases, this hoax involves elements of human verification. Sticking to either one of those recommendations is a bad idea, because it gives the wrong website the privilege to show web push notifications – which is exactly what the Critical Virus Alert is, by the way. That said, the core of the quandary lies in the browser settings, but the bug easily materializes outside the browser in the form of objects piling up in the Mac’s Notification Center.
The screenshot above illustrates the main step to fix the issue if it stems from a permissions takeover on Safari. Just open Safari’s preferences, click the Websites tab, scroll down to Notifications, and make sure any unfamiliar websites have “Deny” next to them. The troubleshooting logic is similar with the other browsers. However, the attack might go further than these settings in situations where the victim interacts with the scam alerts and related landing pages a lot. If so, it’s reasonable to check the Mac for related malware and misconfigurations. The paragraphs below will explain how.
Critical Virus Alert manual removal for Mac
The steps listed below will walk you through the removal of this malicious application. Be sure to follow the instructions in the specified order.
Expand the Go menu in your Mac’s Finder bar and select Utilities as shown below.

Locate the Activity Monitor icon on the Utilities screen and double-click on it.

In the Activity Monitor app, look for a process that appears suspicious. To narrow down your search, focus on unfamiliar resource-intensive entries on the list. Keep in mind that its name isn’t necessarily related to the way the threat is manifesting itself, so you’ll need to trust your own judgement. If you pinpoint the culprit, select it and click on the Stop icon in the upper left-hand corner of the screen.

When a follow-up dialog pops up asking if you are sure you want to quit the troublemaking process, select the Force Quit option.

Click on the Go menu icon in the Finder again and select Go to Folder. You can as well use the Command-Shift-G keyboard shortcut.

Type /Library/LaunchAgents in the folder search dialog and click on the Go button.

Examine the contents of the LaunchAgents folder for dubious-looking items. Be advised that the names of files spawned by malware may give no clear clues that they are malicious, so you should look for recently added entities that appear to deviate from the norm.
As an illustration, here are several examples of LaunchAgents related to mainstream Mac infections: com.updater.mcy.plist, com.avickUpd.plist, and com.msp.agent.plist. If you spot files that don’t belong on the list, go ahead and drag them to the Trash.

Use the Go to Folder lookup feature again to navigate to the folder named ~/Library/Application Support (note the tilde symbol prepended to the path).

When the Application Support directory is opened, identify recently generated suspicious folders in it and send them to the Trash. A quick tip is to look for items whose names have nothing to do with Apple products or apps you knowingly installed. A few examples of known-malicious folder names are com.AuraSearchDaemon, ProgressSite and IdeaShared.

Enter ~/Library/LaunchAgents string (don’t forget to include the tilde character) in the Go to Folder search area.

The system will display LaunchAgents residing in the current user’s Home directory. Look for the following dodgy items related to Critical Virus Alert malware: com.ConnectionCache.service.plist, com.digitalprotection.emcupdater.plist, com.mulkey.plist, com.nbp.plist, and com.sys.system.plist. Drag these files to the Trash.

Type /Library/LaunchDaemons in the Go to Folder search field.

In the LaunchDaemons path, try to pinpoint the files the malware is using for persistence. Several examples of the items cropped by this Mac infection are com.ConnectionCache.system.plist and com.mulkeyd.plist. Delete the sketchy files immediately.

Click on the Go menu icon in your Mac’s Finder and select Applications on the list.

Find the app that clearly doesn’t belong there and move it to the Trash. If this action requires your admin password for confirmation, go ahead and enter it.

Expand the Apple menu and select System Preferences.


Proceed to Users & Groups and click on the Login Items tab.


Now select Profiles under System Preferences. Look for a malicious item in the left-hand sidebar. Several examples of configuration profiles created by Mac adware include AdminPrefs, TechSignalSearch, MainSearchPlatform, and Safari Preferences. Select the offending entity and click on the minus sign at the bottom to eliminate it.


Get rid of Critical Virus Alert scam in web browser on Mac
To begin with, the web browser settings taken over by the Critical Virus Alert malware should be restored to their default values. Although this will clear most of your customizations, web surfing history, and all temporary data stored by websites, the malicious interference should be terminated likewise. The overview of the steps for completing this procedure is as follows:
- Remove Critical Virus Alert pop-up in Safari
- Open the browser and go to Safari menu. Select Preferences in the drop-down list.

- Once the Preferences screen appears, click on the Advanced tab and enable the option saying “Show Develop menu in menu bar”.

- Now that the Develop entry has been added to the Safari menu, expand it and click on Empty Caches.

- Now select History in the Safari menu and click on Clear History in the drop-down list.

- Safari will display a dialog asking you to specify the period of time this action will apply to. Select all history to ensure a maximum effect. Click on the Clear History button to confirm and exit.

- Go back to the Safari Preferences and hit the Privacy tab at the top. Find the option that says Manage Website Data and click on it.

- The browser will display a follow-up screen listing the websites that have stored data about your Internet activities. This dialog additionally includes a brief description of what the removal does: you may be logged out of some services and encounter other changes of website behavior after the procedure. If you’re okay with that, go ahead and click on the Remove All button.

- Restart Safari
- Open the browser and go to Safari menu. Select Preferences in the drop-down list.
- Remove Critical Virus Alert in Google Chrome
- Open Chrome, click the Customize and control Google Chrome (⁝) icon in the top right-hand part of the window, and select Settings in the drop-down

- When on the Settings pane, select Advanced
- Scroll down to the Reset settings section.

- Confirm the Chrome reset on a dialog that will pop up. When the procedure is completed, relaunch the browser and check it for malware activity.

- Open Chrome, click the Customize and control Google Chrome (⁝) icon in the top right-hand part of the window, and select Settings in the drop-down
- Remove Critical Virus Alert scam in Mozilla Firefox
- Open Firefox and go to Help – Troubleshooting Information (or type about:support in the URL bar and press Enter).


- When on the Troubleshooting Information screen, click on the Refresh Firefox button.

- Confirm the intended changes and restart Firefox.
- Open Firefox and go to Help – Troubleshooting Information (or type about:support in the URL bar and press Enter).
Get rid of Critical Virus Alert Mac using Combo Cleaner removal tool
The Mac maintenance and security app called Combo Cleaner is a one-stop tool to detect and remove Critical Virus Alert virus. This technique has substantial benefits over manual cleanup, because the utility gets hourly virus definition updates and can accurately spot even the newest Mac infections.
Furthermore, the automatic solution will find the core files of the malware deep down the system structure, which might otherwise be a challenge to locate. Here’s a walkthrough to sort out the Critical Virus Alert issue using Combo Cleaner:
Download Combo Cleaner installer. When done, double-click the combocleaner.dmg file and follow the prompts to install the tool onto your Mac.
By downloading any applications recommended on this website you agree to our Terms and Conditions and Privacy Policy. The free scanner checks whether your Mac is infected. To get rid of malware, you need to purchase the Premium version of Combo Cleaner.
Open the app from your Launchpad and let it run an update of the malware signature database to make sure it can identify the latest threats.
Click the Start Combo Scan button to check your Mac for malicious activity as well as performance issues.

Examine the scan results. If the report says “No Threats”, then you are on the right track with the manual cleaning and can safely proceed to tidy up the web browser that may continue to act up due to the after-effects of the malware attack (see instructions above).

In case Combo Cleaner has detected malicious code, click the Remove Selected Items button and have the utility remove Critical Virus Alert threat along with any other viruses, PUPs (potentially unwanted programs), or junk files that don’t belong on your Mac.

Once you have made doubly sure that the malicious app is uninstalled, the browser-level troubleshooting might still be on your to-do list. If your preferred browser is affected, resort to the previous section of this tutorial to revert to hassle-free web surfing.