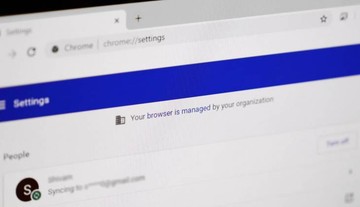
Get rid of the Chrome ‘Managed by your organization’ message on Mac that could be a symptom of adware interfering with browser preferences without permission.
Update:
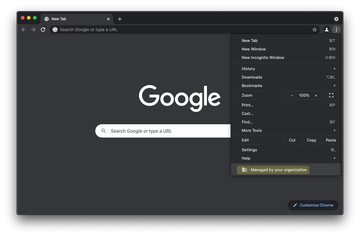
Corporate network admins undoubtedly appreciate the ability to specify enterprise policies in Google Chrome. This feature bridges the gap between a company’s rules for computing and the Internet activities available to the employees. When this functionality is in effect, users will see a message that says, “Managed by your organization” when opening the ‘Customize and control Google Chrome’ menu via the three-dots ‘More’ icon in the upper right-hand part of the browser window. This way, IT teams can easily narrow down the scope of accessible features so that users don’t visit potentially harmful sites. Another benefit is that businesses can install certain browser extensions and define custom settings in one hit. However, cybercriminals look at this situation under a different angle. They deem the enterprise policy mechanism as an opportunity to change Chrome behavior on Mac computers remotely for nefarious purposes.
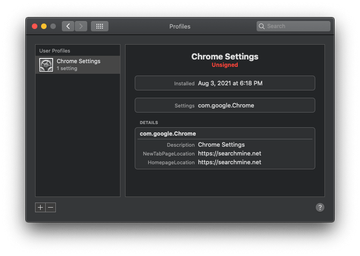
The mishandling of this functionality isn’t far-fetched and goes way beyond theoretical implications. In fact, the operators of some Mac adware campaigns have been leveraging this trick for years to maintain persistence and align Chrome settings with their dubious goals. One of the notorious potentially unwanted applications (PUAs) that’s known to execute this strategy is called SearchMine. Having infiltrated a Mac machine, it configures the browser to act up by replacing the victim’s default settings with searchmine.net. The parameters affected through this technique include Chrome homepage, search engine preferences, and new tab page. The trio is substituted with searchmine.net value that appears to be hard-coded and cannot be modified manually. This tampering paves the pest’s way toward incessant redirects to the fake search engine that further leads to custom Yahoo results. By the way, this exact method is also a distinguishing characteristic of another Mac adware called Safe Finder, which drags victims into a loop of rerouting to search.safefinder.com. The browser hijacker called Search Marquis follows suit. It is a spin-off of a widespread virus that forwards web traffic to Bing via searchmarquis.com and searchbaron.com URLs.
Chrome “Managed by your organization” virus may re-infect your Mac multiple times unless you delete all of its fragments, including hidden ones. Therefore, it is recommended to download Intego Mac and scan your system for these stubborn files. This way, you may reduce the cleanup time from hours to minutes.
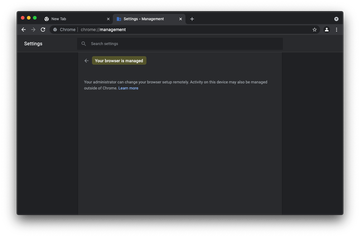
Download Now Learn how Intego Mac works. If the utility spots malicious code, you will need to buy a license to get rid of it.The Mac users who find themselves in this rerouting jeopardy and identify the underlying adware infection quickly realize that the removal of the culprit is on their immediate to-do list. The problem is that changing the wrongly imposed configuration via Chrome’s settings page turns out to be impossible. The homepage, search, and new tab fields are grayed out and don’t allow edits in the regular way. The phrase going “Managed by your organization” at the bottom of the browser main menu drop-down gives a clue that the fix lies deeper than the obvious troubleshooting footwork everyone is knowledgeable about. Another hallmark sign of the weaponized enterprise policy feature is that the ‘chrome://management’ query entered in the URL bar will return a response that says, “Your browser is managed. Your administrator can change your browser setup remotely. Activity on this device may also be managed outside of Chrome”.
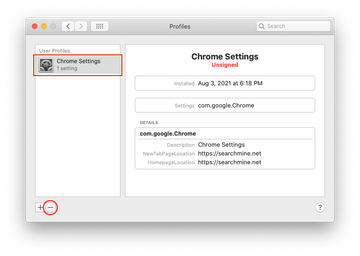
If this is the case, thorough repair will involve a number of steps beyond Google Chrome alone. When the SearchMine virus or another browser-focused PUA crops up on a Mac, it additionally adds a sketchy configuration profile called Chrome Settings or similar. This is another layer of obstinacy for redefining the victim’s computing patterns, in general, and Internet navigation, in particular. Malware operators abuse the system’s command line tool to install a new profile surreptitiously at an early stage of the attack. Eliminating this item is an important prerequisite for sorting out the problem. The detailed instructions on how to do it will be provided further down.
If a piece of malware is to blame for causing the Chrome “Managed by your organization” alert on Mac, it means that the user has previously made a mistake when installing some harmless-looking software. The common origin of the browser hijack is a fake Adobe Flash Player update popup encountered on a fishy or hacked web page. This hoax pretends to install the latest Flash Player version onto the Mac while additionally promoting nasties like SearchMine in a furtive way. Therefore, people would be better off avoiding application bundles altogether, especially if they are pushed by means of questionably legit splash screens on sites.
To recap, “Managed by your organization” message could be unrelated to a valid enterprise policy enforced by a device administrator on a business network. It has also become a part of malware distributors’ handbook. If the latter scenario is in place, be sure to follow the tips below and remove the unwanted setup impacting Chrome behavior on Mac. Be advised that it may also be necessary to tidy up other browsers that are most likely hijacked as well.
Chrome “Managed by your organization” virus manual removal for Mac
The steps listed below will walk you through the removal of this malicious application. Be sure to follow the instructions in the specified order.
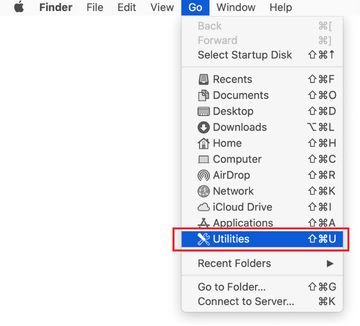
Expand the Go menu in your Mac’s Finder bar and select Utilities as shown below.
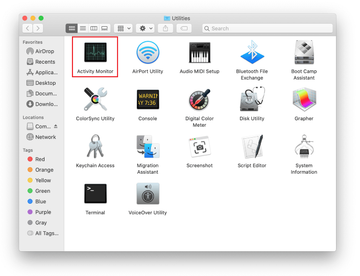
Locate the Activity Monitor icon on the Utilities screen and double-click on it.
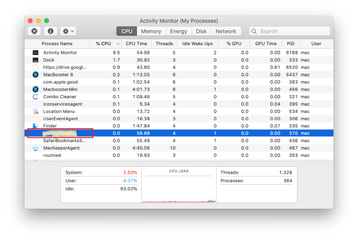
In the Activity Monitor app, look for a process that appears suspicious. To narrow down your search, focus on unfamiliar resource-intensive entries on the list. Keep in mind that its name isn’t necessarily related to the way the threat is manifesting itself, so you’ll need to trust your own judgement. If you pinpoint the culprit, select it and click on the Stop icon in the upper left-hand corner of the screen.
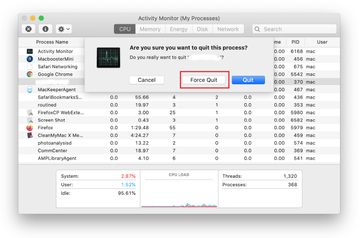
When a follow-up dialog pops up asking if you are sure you want to quit the troublemaking process, select the Force Quit option.
Click on the Go menu icon in the Finder again and select Go to Folder. You can as well use the Command-Shift-G keyboard shortcut.
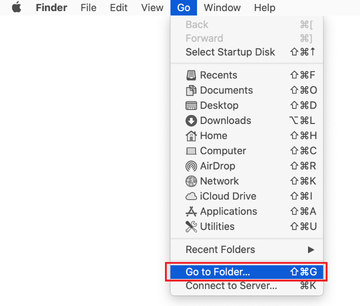
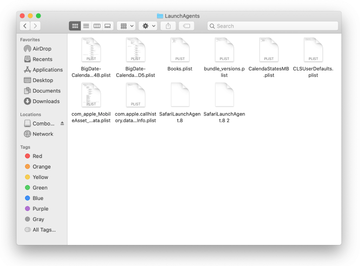
Type /Library/LaunchAgents in the folder search dialog and click on the Go button.
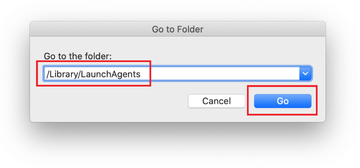
Examine the contents of the LaunchAgents folder for dubious-looking items. Be advised that the names of files spawned by malware may give no clear clues that they are malicious, so you should look for recently added entities that appear to deviate from the norm.
As an illustration, here are several examples of LaunchAgents related to mainstream Mac infections: com.pcv.hlpramc.plist, com.updater.mcy.plist, com.avickUpd.plist, and com.msp.agent.plist. If you spot files that don’t belong on the list, go ahead and drag them to the Trash.

Use the Go to Folder lookup feature again to navigate to the folder named ~/Library/Application Support (note the tilde symbol prepended to the path).
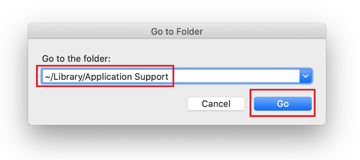
When the Application Support directory is opened, identify recently generated suspicious folders in it and send them to the Trash. A quick tip is to look for items whose names have nothing to do with Apple products or apps you knowingly installed. A few examples of known-malicious folder names are ProgressSite, IdeaShared and ExtraBrowser.

Enter ~/Library/LaunchAgents string (don’t forget to include the tilde character) in the Go to Folder search area.
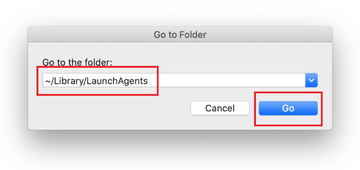
The system will display LaunchAgents residing in the current user’s Home directory. Look for dodgy items related to “Managed by your organization” virus (see logic highlighted in subsections above) and drag the suspects to the Trash.
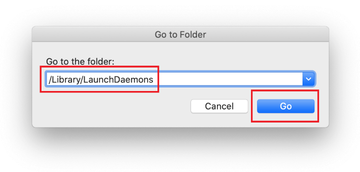
Type /Library/LaunchDaemons in the Go to Folder search field.
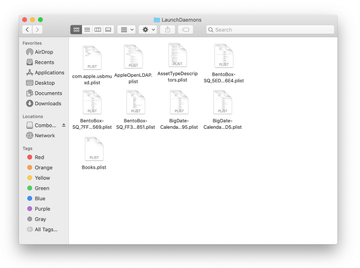
In the LaunchDaemons path, try to pinpoint the files the malware is using for persistence. Several examples of such items cropped by Mac infections are com.pplauncher.plist, com.startup.plist, and com.ExpertModuleSearchDaemon.plist. Delete the sketchy files immediately.
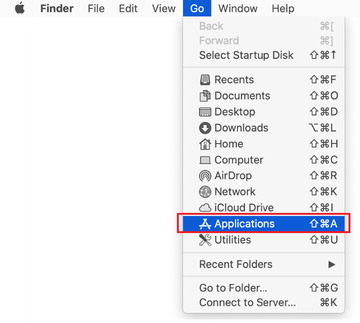
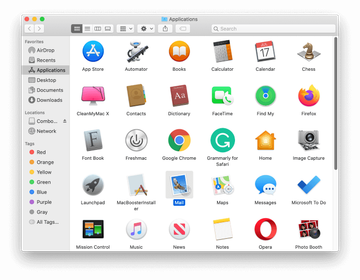
Click on the Go menu icon in your Mac’s Finder and select Applications on the list.
Find the entry for an app that clearly doesn’t belong there and move it to the Trash. If this action requires your admin password for confirmation, go ahead and enter it.
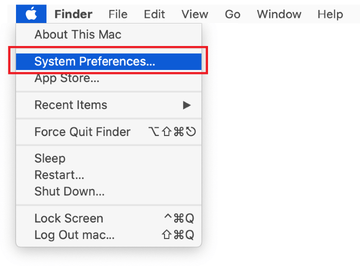
Expand the Apple menu and select System Preferences.
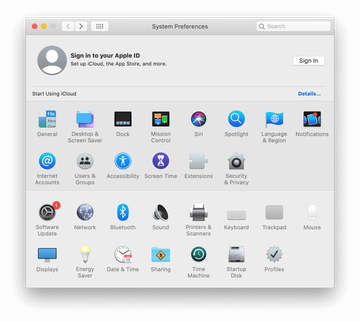
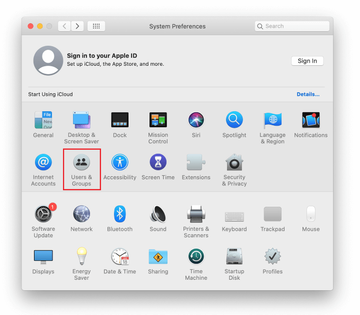
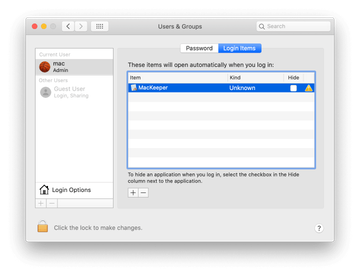
Proceed to Users & Groups and click on the Login Items tab.
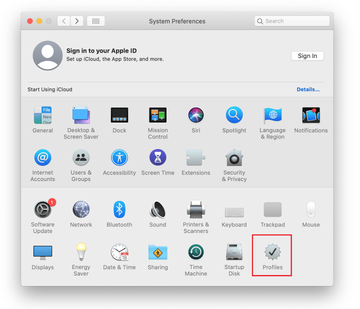
Now select Profiles under System Preferences. Look for a malicious item in the left-hand sidebar. Several examples of configuration profiles created by Mac adware include ChromeSettings, TechSignalSearch, MainSearchPlatform, AdminPrefs. Select the offending entity and click on the minus sign at the bottom to eliminate it.
Get rid of Chrome “Managed by your organization” virus in web browser on Mac
To begin with, the web browser settings taken over by the Chrome “Managed by your organization” virus should be restored to their default values. Although this will clear most of your customizations, web surfing history, and all temporary data stored by websites, the malicious interference should be terminated likewise. The overview of the steps for completing this procedure is as follows:
- Remove Chrome “Managed by your organization” virus from Safari
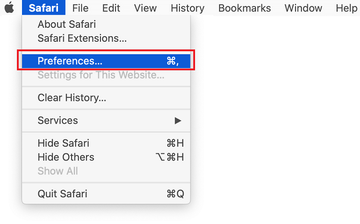
Open the browser and go to Safari menu. Select Preferences in the drop-down list.
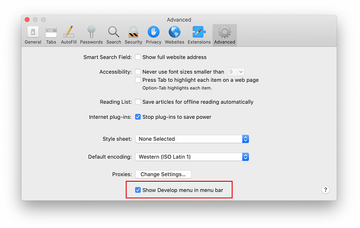
Once the Preferences screen appears, click on the Advanced tab and enable the option saying “Show Develop menu in menu bar”.
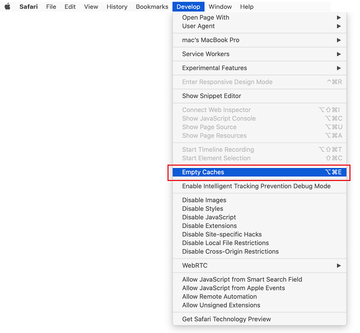
Now that the Develop entry has been added to the Safari menu, expand it and click on Empty Caches.
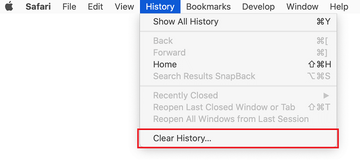
Now select History in the Safari menu and click on Clear History in the drop-down list.
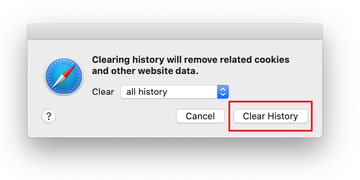
Safari will display a dialog asking you to specify the period of time this action will apply to. Select all history to ensure a maximum effect. Click on the Clear History button to confirm and exit.
Go back to the Safari Preferences and hit the Privacy tab at the top. Find the option that says Manage Website Data and click on it.

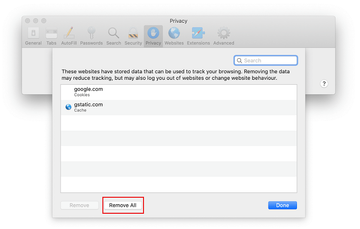
The browser will display a follow-up screen listing the websites that have stored data about your Internet activities. This dialog additionally includes a brief description of what the removal does: you may be logged out of some services and encounter other changes of website behavior after the procedure. If you’re okay with that, go ahead and click on the Remove All button.
Restart Safari
- Remove Chrome “Managed by your organization” in Google Chrome
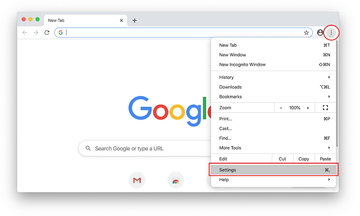
Open Chrome, click the Customize and control Google Chrome (⁝) icon in the top right-hand part of the window, and select Settings in the drop-down
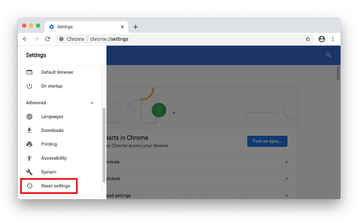
When on the Settings pane, select Advanced
Scroll down to the Reset settings section.
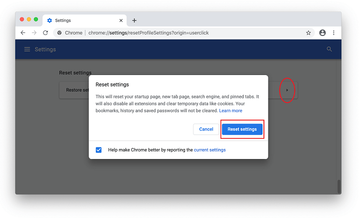
Confirm the Chrome reset on a dialog that will pop up. When the procedure is completed, relaunch the browser and check it for malware activity.
- Remove Chrome “Managed by your organization” from Mozilla Firefox
Open Firefox and go to Help – Troubleshooting Information (or type about:support in the URL bar and press Enter).
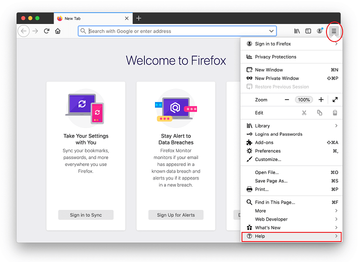
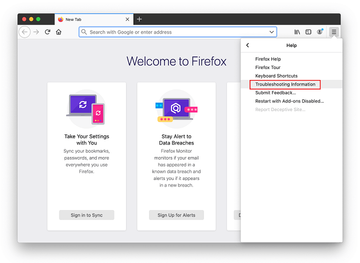
When on the Troubleshooting Information screen, click on the Refresh Firefox button.
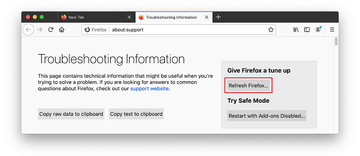
Confirm the intended changes and restart Firefox.
Get rid of Chrome “Managed by your organization” virus using Combo Cleaner removal tool
The flip side of manual Chrome “Managed by your organization” removal is that you may waste hours trying to find all of its files, only to discover that some of them have slipped below the radar and continue to affect your system. To increase the cleanup efficiency, use a reliable security toolkit called Mac Premium Bundle X9 by Intego.
Tailor-made exclusively for the Mac, it will easily detect and delete all components of the infection that’s giving you a hard time. In addition to the incredibly effective VirusBarrier module that fights malicious code, the solution includes Internet security, network protection, data backup, and Mac optimization features. Here is how this app can make Chrome “Managed by your organization” vanish in a snap:
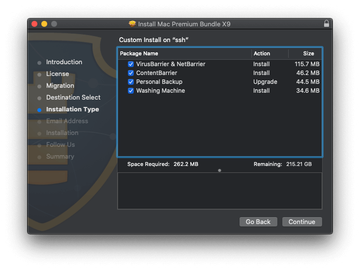
Download Intego Mac Premium Bundle X9 installer. Run it and follow on-screen prompts to install the tool on your Mac. Make sure the VirusBarrier package is checked as illustrated below.
By downloading any applications recommended on this website you agree to our Terms and Conditions and Privacy Policy. The free scanner checks whether your Mac is infected. To get rid of malware, you need to purchase the Full version of Intego Mac Premium Bundle X9.
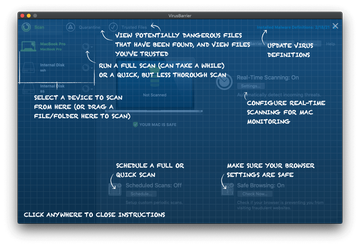
Open Launchpad from your Dock and select the newly added VirusBarrier app. The welcome screen will show a few tips to give you an idea of the features under the hood. Once you familiarize yourself with the instructions, click anywhere to close them and proceed with Mac cleanup.
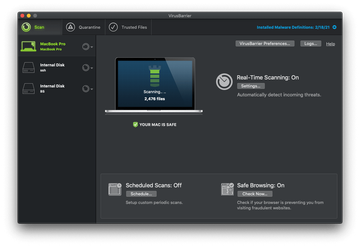
Click the arrow icon in the left-hand sidebar next to the disk you need to check for threats and select Full Scan.
Once the scan finishes, VirusBarrier will list the malicious files it has detected. All of them are automatically moved to Quarantine to prevent further damage to your Mac.
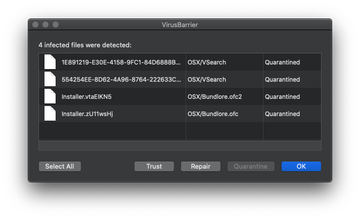
Click the Select All button and then Repair to completely remove the harmful items. From now on, the malware won’t be affecting your Mac anymore.
