Considering how packed with features the iPhone is, it’s easy to lose sight of some of the basics, like the good old call history. It’s like a library of your interactions, showing your incoming, outgoing, and missed calls, along with the times, dates, and duration of each call.
The entries in your call log can be important for any number of reasons. But what happens when you lose your phone, it malfunctions, or you mistakenly delete the call log? In that case, you would be unable to reference a critical call, extract contact information, or just return that missed call.
Thankfully, there’s a way out, and it lies in the cloud — specifically Apple’s iCloud.
Firstly, let’s familiarize ourselves with ESG. What is ESG and how does it connect to your iPhone's call history? Well, ESG represents Environmental, Social, and Governance principles, which are not just buzzwords but crucial standards that companies, including Apple, are now held accountable for.
Understanding these principles is becoming increasingly important because they reflect a company's commitment to ethical practices, data privacy, and responsible management, all of which tie into how your personal data, including call history, is handled.
iCloud and your call history
Simply put, iCloud is Apple's cloud storage service. It lets you store and sync various items like your photos, documents, device backups, and, well, your call history. Your iCloud is basically like having a secure vault that you can access from your iPhone, iPad, or even your VOIP phone system — if you're using Apple devices for business purposes.
The iPhone stores the 1,000 most recent calls, regardless of how old they are. However, only the last 100 calls are displayed on the device itself. If you want to look farther back, you can remove some of the most recent entries.
What if you stop using iCloud? The call information and other data from your last backup are stored for 180 days, and then it is deleted.
How to view call history on your iPhone
Before you move to the cloud, you can check your call history the regular way for that outbound, inbound, or missed call. While this may seem like common knowledge, there’s always that new iPhone user who hasn't explored this feature fully.
- Locate and tap the Phone app on your iPhone's home screen. The app icon typically features a green phone receiver.
- Inside the Phone app, you'll find a series of tabs at the bottom. Tap the Recents tab, represented by a clock icon. This is where you’ll find your call history.
- Here, you'll see a list of your recent calls. Incoming calls are displayed in green, outgoing calls in blue, and missed calls in red. You can scroll through this list to review your call history.
- Tap on the i icon to see more information about a specific call. It will reveal details like the call duration, the date and time, and more.
How to view call history on iCloud
Accessing your call history on iCloud is pretty straightforward. Here’s a simple four-step guide:
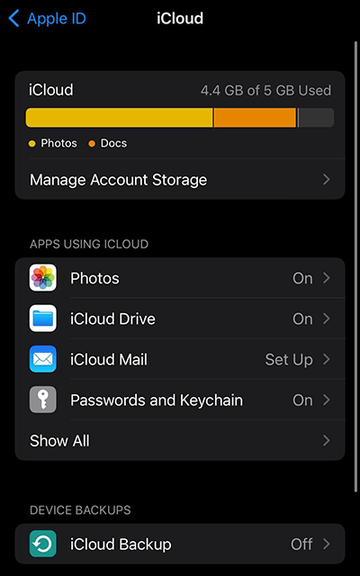
- Go to Settings on your iPhone. Click your name to access your Apple ID settings. Next, tap on iCloud.

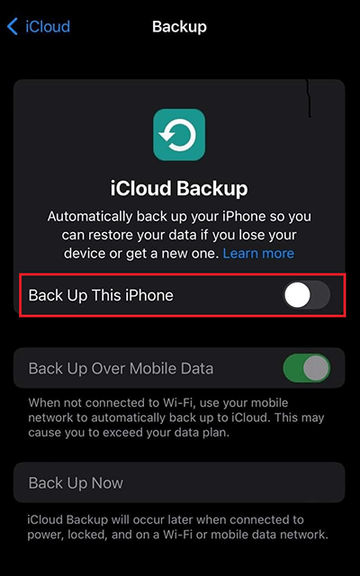
- Select iCloud Backup from the iCloud settings menu and then Back Up Now. Make sure your phone is connected to Wi-Fi throughout this process.

- Next, log in to your iCloud account. On your web browser, go to iCloud.com. Input your login credentials in the spaces provided.
- Once you’ve logged in, you can view your iPhone call history as you would on your iPhone. Click the Phone icon to inspect your call log, organized by date, caller information, call type (incoming, outgoing, missed), and call duration. What’s more, you can locate specific call records with the search and filtering features.
When accessing your call history through iCloud, rest assured that Apple maintains stringent cloud security measures to protect your data. This ensures that your call history remains private and accessible only to you.
You can stop here if you only need your call history for reference purposes or to enhance customer service. However, if you want to switch devices, recover from a factory reset, or retrieve your call history on a new phone, move on to the next stage.
How to retrieve call history from iCloud
Note that you cannot retrieve individual call logs or preview your call history before recovering it from iCloud. Let’s get down to it.
- Head to Settings on your iPhone and tap General. Select Transfer or Reset iPhone.
- From the available options, select Erase All Content and Settings.
- You'll be prompted to provide your Apple ID. This step is necessary to proceed with the factory reset process. Wait while the phone resets.
- Once done, follow the iOS device setup instructions. On the App & Data page, select Restore from iCloud Backup.
- Sign in to your iCloud account with your Apple ID credentials.
- Next, you see a list of available iCloud backups. Choose the backup that contains the call history you want to retrieve. The size of the selected backup determines how long the recovery process will take.
- Once you’re done restoring from the iCloud backup, set up your iPhone as usual.
Check if your call history has been successfully retrieved from iCloud by heading to your call logs.
If you have any questions or need assistance with iCloud settings, you can reach out to the Apple contact center UK for expert guidance.
The bottom line
You can only see the last 100 calls on your iPhone’s call history, but it holds significant value for various purposes. Fortunately, through iCloud, Apple has provided a way to access and recover these call records. It can come in handy whether your phone goes missing or there’s an unforeseen emergency.
This article provided an easy-to-follow guide for viewing and retrieving your call history from iCloud. The steps outlined here work on any recent iOS version, so you should have no issues following them.
FAQ
What is iCloud?
iCloud is Apple’s proprietary cloud storage and cloud computing service. It lets you store data like documents, photos, and music on remote servers for download to multiple devices. You can store your call history and retrieve it when necessary. It also offers other web-based services, including customizable email solutions, where you can conveniently use your UK or Israel domain, for instance.
Can I view and retrieve my call history with third-party software?
Yes, you can use a third-party tool. There are several different options available, but be sure to choose one that is reputable and has a good track record.
