The article is intended to give Mac users an insight into the Slick Savings ads problem and provides a viable technique to get rid of this browser virus.
Adware applications are steadily increasing reach as they are invading the Mac niche, with some success unfortunately. Their behavioral properties in regards to this popular platform are in no way different from the attributes of Windows-specific duplicates: they slither into machines as part of bundled downloads and add rogue browser helper objects to display annoying ads wherever the user goes online. At first sight, this may look like a web page issue, where the webmaster may have decided to get a quick return on investment and opted into an obtrusive pay-per-click campaign. But the victims promptly discover that similar promotional materials appear on different, unrelated sites, which indicates that the pest resides inside the Mac rather than the server side. All of this applies to Slick Savings, an adware plague that drives users nuts until they eradicate it.
Slick Savings is considered to be a part of the Spigot family, one of the oldest strains on the adware arena. Mac users typically catch it in the course of tricky application setups. Cybercriminals love to embed malicious artifacts into packages containing several benign items. This distribution vector, commonly referred to as bundling, ensures that unsuspecting users accept the Terms and Conditions for a combo of utilities, thus also agreeing to install a potentially unwanted app like Slick Savings. Technically, the scheme is flawless from the legal viewpoint, but the ethical facet leaves a lot to be desired.
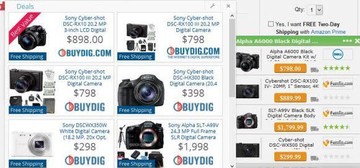
Once this corrupt code infiltrates into a computer running any version of Mac OS X, it instantly configures the system to launch the bad process upon logon. Furthermore, it pulls in a cross-browser add-on that has a significant impact on the way all browsers operate. Said extension triggers promo content on ecommerce sites, search engines and other types of web pages. These objects will appear in the form of deals, coupons, freebies, comparison shopping boxes, and banners signed “Ads by Slick Savings”, “brought by Slick Savings”, or “Slick Savings ads”. Their size may be big enough to overlap the bulk of original site content, which makes the victim’s web surfing experience go down the drain. Interstitial ads and other types of pop-unders will be showing up off and on.
Slick Savings does not belong on a healthy Mac. It slows down one’s web browsers, diminishes their online experience, and may collect personally identifiable data as well. Continue reading to learn how to remove this adware and get rid of the irritating ads.
Slick Savings manual removal for Mac
The steps listed below will walk you through the removal of this application. Be sure to follow the instructions in the order specified.
• Open up the Utilities folder as shown below
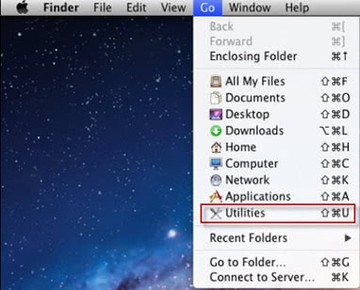
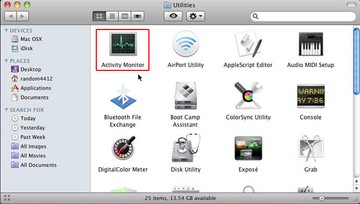
• Locate the Activity Monitor icon on the screen and double-click on it
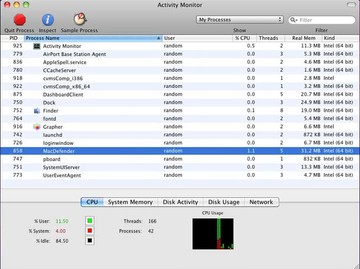
• Under Activity Monitor, find the entry for Slick Savings, select it and click Quit Process
• A dialog should pop up, asking if you are sure you would like to quit the Slick Savings executable. Select the Force Quit option
• Click the Go button again, but this time select Applications on the list. Find the Slick Savings entry on the interface, right-click on it and select Move to Trash. If user password is required, enter it
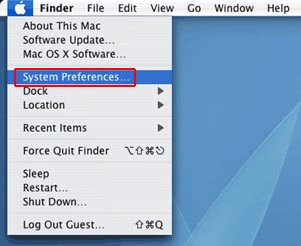
• Now go to Apple Menu and pick the System Preferences option
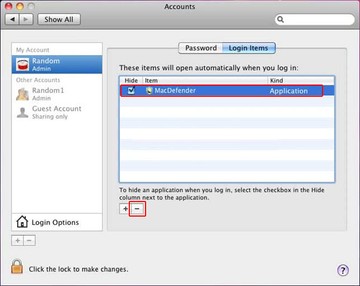
• Select Accounts and click the Login Items button. Mac OS will come up with the list of the items that launch when the box is started up. Locate Slick Savings there and click on the “-“ button
Prevent browser issues caused by Slick Savings
Settings for the web browser that got hit by Slick Savings and affiliated adware should be restored to their default values. The overview of steps for this procedure is as follows:
1. Reset Safari
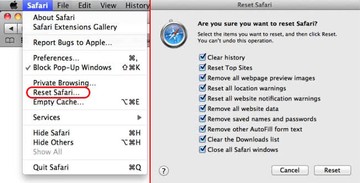
• Open the browser and go to Safari menu. Select Reset Safari in the drop-down list
• Make sure all the boxes are ticked on the interface and hit Reset
2. Reset Google Chrome
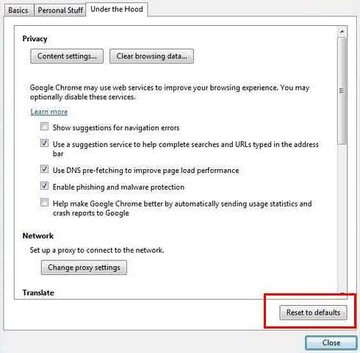
• Open Chrome and click the Customize and Control Google Chrome menu icon
• Select Options for a new window to appear
• Select Under the Hood tab, then click Reset to defaults button
3. Reset Mozilla Firefox
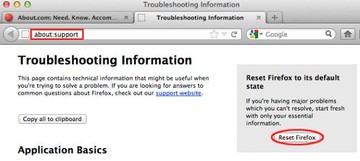
• Open Firefox and select Help – Troubleshooting Information
• On the page that opened, click the Reset Firefox button
Get rid of Slick Savings adware using Combo Cleaner automatic removal tool
The Mac maintenance and security app called Combo Cleaner is a one-stop tool to detect and remove Slick Savings ads virus. This technique has substantial benefits over manual cleanup, because the utility gets hourly virus definition updates and can accurately spot even the newest Mac infections.
Furthermore, the automatic solution will find the core files of the malware deep down the system structure, which might otherwise be a challenge to locate. Here’s a walkthrough to sort out the Slick Savings ads issue using Combo Cleaner:
Download Combo Cleaner installer. When done, double-click the combocleaner.dmg file and follow the prompts to install the tool onto your Mac.
By downloading any applications recommended on this website you agree to our Terms and Conditions and Privacy Policy. The free scanner checks whether your Mac is infected. To get rid of malware, you need to purchase the Premium version of Combo Cleaner.
Open the app from your Launchpad and let it run an update of the malware signature database to make sure it can identify the latest threats.
Click the Start Combo Scan button to check your Mac for malicious activity as well as performance issues.
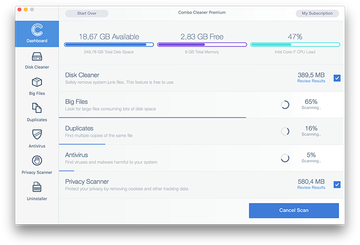
Examine the scan results. If the report says “No Threats”, then you are on the right track with the manual cleaning and can safely proceed to tidy up the web browser that may continue to act up due to the after-effects of the malware attack (see instructions above).
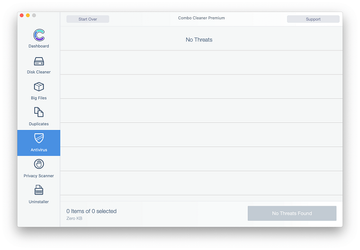
In case Combo Cleaner has detected malicious code, click the Remove Selected Items button and have the utility remove Slick Savings ads threat along with any other viruses, PUPs (potentially unwanted programs), or junk files that don’t belong on your Mac.
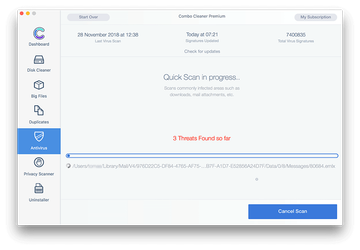
Once you have made doubly sure that the malicious app is uninstalled, the browser-level troubleshooting might still be on your to-do list. If your preferred browser is affected, resort to the previous section of this tutorial to revert to hassle-free web surfing.
