![Where do screenshots go on Mac [2026 Update]](/img/S2HoiAaFJg-360-where-do-screenshots-go-on-mac.png)
Screenshots are quick notes that users apply to record or share important information and what happens on their devices. As a Mac user, you can use several shortcut keys to capture screenshots of different types.
To take the full screen, hold Shift + Command + 3. If you want to capture the selected area or content, just hold Shift + Command + 4. Snapping a specific window on your PC, Shift + Command + 4, and then Space. You can also hold Shift + Command + 5 to open Screenshots and display the tools.
Upon taking screenshots, the most common question people encounter is where the screenshots went. This article will tell you how to find Mac screenshots and recover lost files on Mac if you can’t locate them. Let’s dive in!
Where do screenshots go on Mac, and what’s the default location
The screenshots taken with the built-in tools will be saved automatically to your desktop by default for macOS Mojave and later users. You can go to the Desktop or access them by opening the Desktop folder with Finder. By default, the screenshot files will be named something like ‘Screenshot 2024-04-17 at 16.32.10’, according to the date and time they were snapped. But your screenshots will be saved in the Document folder if you are still running the older macOS, like Sierra or earlier.
How to change the destination folder using the built-in Screenshot app or Terminal
Given that you can drag the screenshots anywhere on the desktop, the desktop can be a mess if you capture too many snapshots quickly. Changing the default save directory can ease the process and better archive your screenshots. Methods vary according to your operating system.
Using the Screenshot toolbar options (available from macOS Mojave onwards)
If you are running macOS Tahoe, Sonoma, Sequoia, Monterey, Big Sur, Catalina, or Mojave, it is very simple to change where screenshots are saved using the Screenshots toolbar:
Step 1. Press Command + Shift + 5 simultaneously to open the Screenshot app.
Step 2. Choose and click "Options".
Step 3. Select the preferred location from the Save to section.

Now, you have successfully changed the snapshots save location on your Mac.
Modifying the default save location via Terminal with the default write command
If you are running an earlier version of MacOS, changing the default folder that saves your screenshots may be a bit difficult. You need to finish this process with the help of Terminal and commands. Do as follows:
Step 1. Create a new folder on your Mac. Name it with something easy to remember, like My Screenshots.
Step 2. Then, hold Command + Space to open the Spotlight search window. Type Terminal and press Return.

Step 3. Once the Terminal window appears, type the following command: defaults write com.apple.screencapture location

Step 4. Next, drag the folder you just created onto the Terminal window. Once you see the folder path displayed after the command, hit Return and quit Terminal.
What to do if you can’t find screenshots on Mac
If you did not change the save location of screenshots but cannot find them on your desktop, your files may have been moved to a project folder, or you may have accidentally deleted them. Do not worry; both can be solved in the corresponding ways.
Use the Finder search bar
If you just moved the screenshots to an unknown folder, you can first use the Finder search bar to locate them.
Step 1. Hold Command + F to open the Finder. The Finder search window will be presented.
Step 2. Click "This Mac" next to Search for the whole boot drive.
Step 3. Copy and paste the following command in the search bar and hit Return:
kMDItemIsScreenCapture:1

You can now view all the screenshots you snapped.
Try Mac data recovery software
If you cannot find the screenshots with Finder, you have likely accidentally deleted them. In this case, recovering and restoring lost snapshots is the only way out. Professional data recovery software would be a wise choice to help you recover deleted screenshots as soon as possible. EaseUS Data Recovery Wizard for Mac can perform Mac screenshot recovery with a 99.7% success rate and solve all these data loss scenarios with just a few clicks.
Check the instructions below to get your lost screenshots back with EaseUS Mac data recovery software:
Step 1. Launch EaseUS Data Recovery Wizard for Mac. Choose the location where your screenshots were originally saved and click "Search for lost files".

Step 2. When the scanning is completed, the photos found will be presented in the left panel. You can locate your screenshots by their name, type, and path.
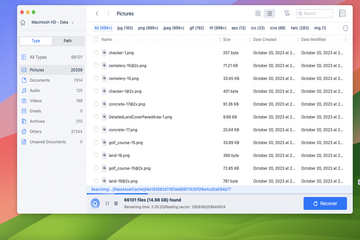
Step 3. To preview the selected photos, just double-click them. Once you have checked the photos you want to retrieve, click on the "Recover" button.

Tips for organizing and managing screenshots
Here are some tips for better organizing and managing your screenshots and nip data loss in the bud.
- Naming screenshots for easy identification: Name your screenshots according to their usage and date. For example, you can name your gameplay screenshot ‘LOL 2024.4.17’.
- Sorting screenshots into folders for better organization: Create an exclusive folder to save your screenshots and change the default save location to archive them easily.
- Deleting unwanted screenshots: If your space is limited, checking your screenshots and deleting unnecessary ones regularly would be helpful.
- Save screenshots to iCloud: The best way to avoid file loss is to backup regularly. You can save screenshots to your iCloud in case of unintentional deletion.
- Automation of deployment and updates.
Final words
This post has discussed where do screenshots go on Mac and what to do when you cannot find your screenshots. Utilizing the Finder search utility is your go-to choice to locate the missing or hidden screenshots. But if your snapshots cannot be found with the help of Finder, they may be deleted unintentionally. In this case, a third-party tool like EaseUS Data Recovery Wizard for Mac would be your ultimate lifesaver.