Learn several easy ways to stop annoying notifications on Mac, keeping in mind that the applicable method must align with the origin of such pop-ups.
What are notifications on your Mac?
Staying on top of things is an indispensable part of today’s busy life, especially its digital dimension. When it comes to the Mac user experience, this nontrivial task largely comes down to notifications. As computing has come to be so heterogeneous and multifaceted, the spectrum of these pop-ups is now incredibly wide. Some of them alert people to availability of new software updates, some remind of tasks to complete, others put important appointments to one’s radar – the list goes on and on.
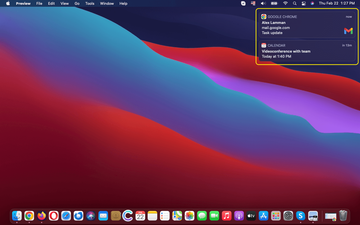
The macOS Notification Center is home to most of these little “nudges” that keep users informed. Whenever the operating system or applications have something new – potentially urgent – to let you know about, you’ll notice a relevant box appear in the right-hand part of the home screen. These objects are clickable and hence interactive, leading to whatever step you need to take – whether it’s a system or program update, an upcoming or missed Calendar event, new email in the inbox, or a must-see publication on a website that was granted the permission to keep you in the loop.
Although sometimes these entities can accumulate and pile up on the desktop, the idea behind them is undoubtedly commendable. Information is brought right to one’s fingertips without the need to remember everything. This activity can get obnoxious, yet it plays a benign role. But, as is often the case, there’s a flip side.
Notifications can make or break
Over the past few years, I’ve witnessed an overlap between Apple’s hardening protections against malware and cybercriminal abuse of the very gist at the core of notifications. The fact that the software ecosystem has been subject to an ever-tightening control on the Mac maker’s side has made it harder for threat actors to infect these machines with malicious code.
The system simply won’t let an app in unless it passes scrupulous verification for anomalies, such as sketchy signatures or a missing notarization verdict. The App Store is a closed territory with a heightening entry barrier for crooks. Furthermore, the nearly mainstream M1 system-on-a-chip (SoC) design introduces security built into hardware.
Under the circumstances, which are definitely beneficial to the average user, bad guys came up with a clever scheme that allows them to bypass these defenses in a snap. It hinges on – you guessed it – the Mac notifications principle. Instead of creating outright malware and depositing it on a system, black hats can try and hoodwink people into allowing, say, a site to display web push notifications.
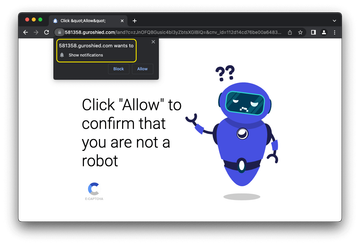
The classic hoax involves fake human verification dialogs on websites. Once you click “OK” to confirm that you are not a robot, they set pop-up activity in motion instead. Some of these web pages instruct you to prove you are human by clicking “Allow” in a “[site name] wants to show notifications” alert, although these are clearly different things. The worst part is that these ads will be flooding the desktop even if the browser isn’t open.
Scams abusing the notification logic on Mac
The workflow described in the previous paragraph is the way the now-infamous Ask You virus works. Technically, it’s not a virus per se because it can’t replicate itself in a host system, but it got this cliché term attached to it because of how obtrusively it acts and how big this scam campaign has grown. The attack strongly relies on the human element as it gains momentum after an unsuspecting user provides one-time consent to receive notifications from a specific harmless-looking site. This permission is isolated to the browser on which the web page was visited, but that’s cold comfort if this browser is allowed to display notifications and the user never bothered to check and revoke such potentially redundant settings.
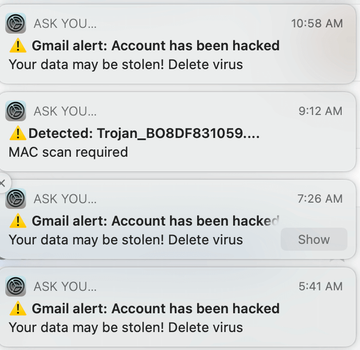
As a result, the victim ends up stuck with dozens of misleading web push alerts that say something along the lines of “Gmail alert: Account has been hacked. Your data may be stolen! Delete virus”, “System macOS is infected! Choose an action to restore the system”, or “Your iCloud has been hacked! Click here to remove the virus”. The information in these warnings is a far cry from being true, but many people get anxious enough to click them, only to be scammed or download a “cleaner” that’s malware in disguise.
Similar trickery underpins another notorious wave of fraud involving rogue Calendar events. By knowing the email address tied to one’s Calendar account on Mac and iPhone, a perpetrator can create dodgy appointments that cause the app to display reminders with custom content in them. Predictably, scam operators use a garden-variety scare tactic to dupe people into installing real malware or handing over sensitive data.
Whether you’re faced with an influx of regular notifications that distract you all the time and don’t belong on your Mac, or you are struggling to stop the deceptive Ask You and Calendar events pop-ups – the fix is pretty easy. In most scenarios, you can simply turn them off with a few clicks. The following section will point you in the right direction.
5 ways to disable notifications on Mac
Let’s go over the best practices to get unwanted notifications out of the way on your Mac machine. Some of these techniques work indiscriminately and halt all such activity temporarily. Some are focused on dialogs originating from an app or a website. Without further ado, pick the method that works for you and finally heave a sigh of relief.
1. Stop or pause notifications using Do Not Disturb feature
- Open the Control Center by clicking the double-toggle icon in the Mac menu bar and click Do Not Disturb.
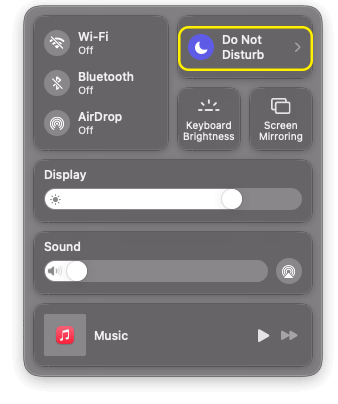
- Specify the required time frame for pausing notifications.
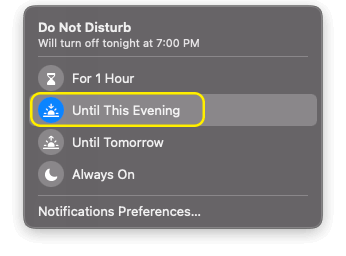
- If you want to configure this feature in depth, select Notifications Preferences in the dialog above. You can open the same screen by heading to System Preferences > Notifications.
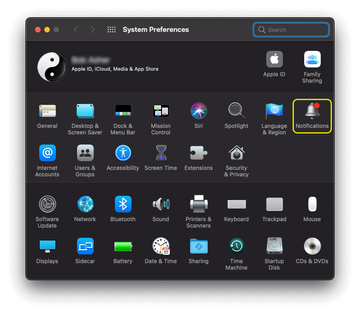
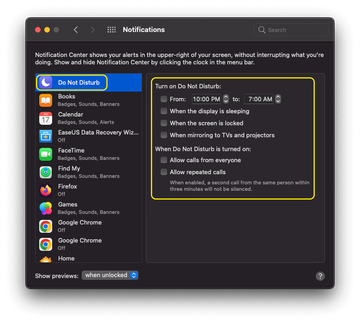
- Now select Do Not Disturb in the list and customize it as appropriate (see options in the screenshot below).
2. Get rid of notifications shown by apps on Mac
If you’d rather disable pop-ups from a specific application (provided that you know which one it is), then use the following steps.
- Open System Preferences and click Notifications. Find the app from which you’d like to stop seeing pop-ups and slide the toggle switch to the Off position.
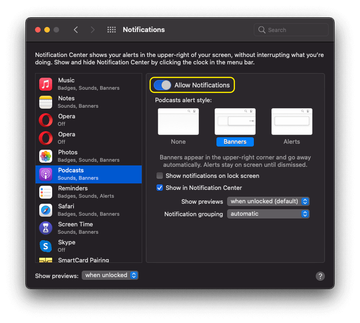
The interface also allows you to adjust the style of notifications from the app without disabling them. For instance, banners can be less annoying because they vanish shortly after appearing, unlike alerts that need to be dismissed.
3. Turn off unwanted notifications from websites on Safari
As previously mentioned, some of the shadiest dialogs in the Mac’s notifications area tend to be displayed by sites. If you’ve given an arbitrary web page the permission to show notifications, then you’ll need to revoke it. Here’s how:
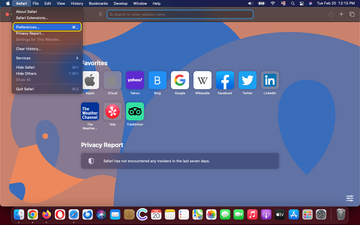
- Expand the Safari menu and select Preferences as illustrated below.
- Click the Websites tab and find the unwanted one in the list with an “Allow” setting next to it.
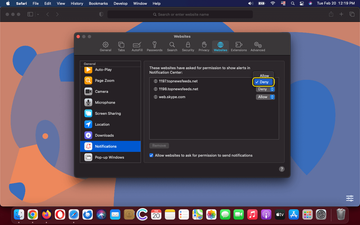
- Change that value to “Deny” and restart Safari. This should fix the problem.
4. Get rid of website notifications on Chrome
Due to its popularity, Google Chrome happens to be a very common source of malicious notifications on Mac. If this is the case, use the following steps to address the issue.
- Click the Customize and control Google Chrome icon (the one with three vertical dots) and select Settings.
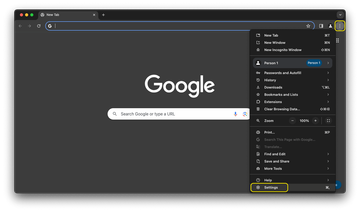
- Go to Privacy and security > Site settings.
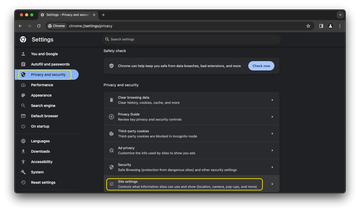
- Scroll down to locate the website with an “Allowed notifications” label. Click the arrow button next to it.
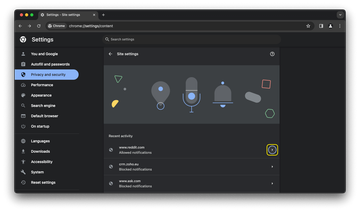
- In the Permissions area for the chosen site, find Notifications and select the “Block” setting for it.
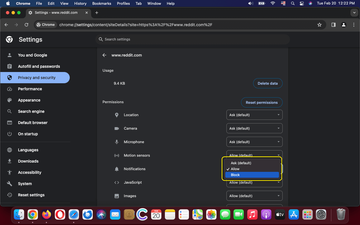
- Relaunch Chrome and check if the problem has been resolved.
5. Disable website notifications on Firefox
If you prefer Mozilla Firefox for web surfing, it’s likely that the rogue permission lurks within this browser’s customizations. Here’s how to undo the unwanted changes.
- Click the Open application menu button (the three horizontal lines icon) and select Settings.
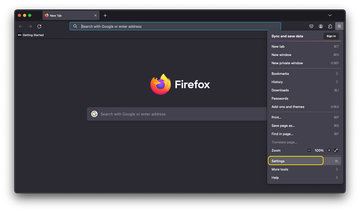
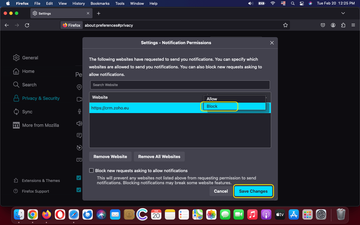
- Choose Privacy & Security in the sidebar, scroll down to the Permissions area, spot Notifications, and click Settings next to it.
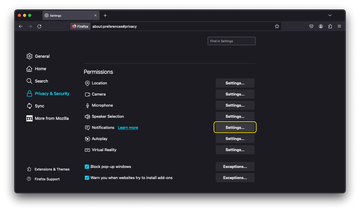
- Check the Notification Permissions window for websites with an “Allow” value next to them. Change it to “Block”. You can also remove the website from the list altogether. Click “Save Changes”.
- Restart Firefox to make doubly sure the tweaks are in effect.
