It seems inevitable that machines will fail you every now and then because they are not perfect. And the same goes for Mac computers equipped with advanced components, although they deliver excellent performance in most cases. One of the most annoying problems that befall Mac users is Mac won’t turn on.
Generally, there are two probable scenarios you may encounter when the Mac can’t boot up. You press down the power button and release it but nothing happens at all, no chime, no lighting up, your Mac seems dead. Or, some abnormal phenomena appear, preventing the Mac from booting up successfully, such as the screen showing a circle with a line through it or a question mark, Mac won’t boot past Apple logo, Mac stuck on loading screen, etc.
None of the above issues can be solved with ease. Worse, they make all the files stored on Mac inaccessible and pose the risk of data loss. Thus, it is prominent to recover data from Mac that won’t turn on as soon as possible. Here, we are going to introduce 4 proven solutions for you to rescue files from an unbootable Mac.
Run iBoysoft Data Recovery for Mac
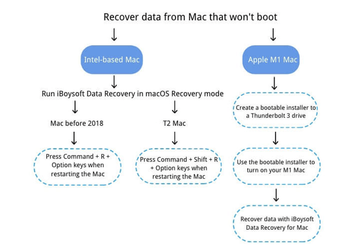
The reasons causing Mac won’t turn on are various. Hard drive corruption is the most common culprit. In this case, the professional data recovery software can find out lost files on the drive and restore them. iBoysoft Data Recovery for Mac is the best choice featured with advanced file scanning algorithms, fast scanning&recovery speed, and high recovery rate. Here is a stepwise tutorial.
1. Boot your Mac into macOS Recovery mode, a recovery system that helps you fix or deal with system-related issues on your Mac.

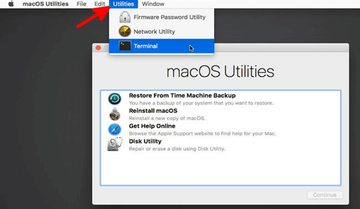
2. Choose a network for your Mac. Then open Terminal from the drop-down menu.

3. Type the following command in Terminal and press the Return key, it will launch iBoysoft Mac Data Recovery on your Mac. Type password if asked.
sh <(curl http://boot.iboysoft.com/boot.sh)
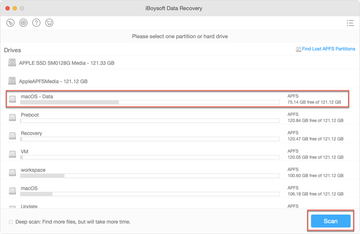
4. After launching iBoysoft Mac Data Recovery, follow the wizard to scan data from Mac hard drive, you can preview the scanning results and choose the desired files to recover.

Restore Data from Time Machine
Time Machine is the built-in backup feature of your Mac. If you have enabled Time Machine on your Mac, it will automatically back up your personal data, including apps, music, photos, email, and documents by creating images or snapshots. Having a backup allows you to recover specific files or the whole system. It will not only recover your data but also get an unbootable Mac back on track.
But bear in mind that Time Machine does not back up your files every second and every minute, it makes hourly backups for the past 24 hours, daily backups for the past month, and weekly backups for all previous months. Therefore, for the newly added data that have not been backed up timely, you cannot restore them from Time Machine. Follow the steps below to give it a shot.
1. Connect the external hard drive used for Time Machine Backup to your Mac.
2. Boot your Mac in macOS Recovery mode.
Mac with Apple silicon M1 chip: Press and hold the power button on your Mac until “Loading startup options” appears, then click Options > Continue. Enter the password for the administrator account if asked.
Mac with Intel chip: Turn on your Mac and immediately press and hold Command + R until you see an Apple logo or a spinning globe.
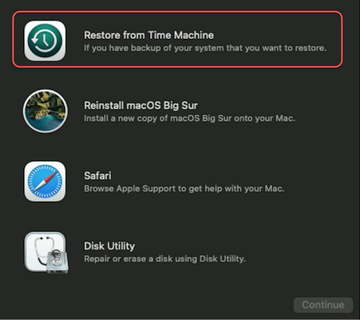
3. Select Restore From Time Machine Backup from the Utilities window and click Continue.
4. Select the backup drive > the latest Time Machine backup and click Continue.
5. Choose a drive where to save the Time Machine backup and click Continue.
6. Erase the destination disk first, and click Restore.

Use Target Disk Mode
Target Disk Mode can make the source Mac work like an external hard drive on another Mac. By connecting two Macs with Target Disk Mode, you can open and copy your files stored on the Mac that won’t turn on. And this feature is called Share disk/Mac Sharing Mode on M1 Mac. Check how to recover data with this tool.
On an Intel Mac:
1. Connect two Macs with Thunderbolt cable or FireWire.
2. Start the source Mac up while pressing and holding the T keys.
3. A Thunderbolt or FireWire icon shows on the screen.
4. A disk icon pops up on the desktop of the other computer.
5. Transfer files by dragging them from the disk. Then drag it to the Trash to eject, and disconnect the cable.
On an Apple silicon Mac:
1. Connect two Macs with a USB, USB-C, or Thunderbolt cable.
2. Press and hold the power button on the source Mac until the "Loading startup options" appears.
3. Click Options > Continue, enter the password for your administrator account.
4. Select Utilities > Share Disk, and click the drive from which you want to recover data, then click Start Sharing.
5. On the other Mac, click Finder > Locations > Network.
6. In the Network window of the second Mac, double-click your M1 Mac, click Connect As > Guest > Connect.
7. You can view and copy the files you want. Then eject the disk on the other Mac.
Remove the Internal Drive
Unfortunately, your Mac is dead and is not responding when you press down the power button. It may be the battery failure or some other serious malfunctions that make your Mac unresponsive. The last resort is to physically remove the drive inside of your Mac and mount it on another Mac to get the stored data off.
This method is complicated and risky. For the sake of data security, you’d better seek the help of a technician. It needs to remove the internal hard drive from the Mac logic board and put it in an enclosure, then use a cable to connect the removed drive to another Mac.
However, not all Macs’ internal hard drives are removable. For a Mac using new technology such as onboard SSD, Apple T2 Security encryption, and Apple silicons, things become intricate. Besides, removing the built-in drive will void the warranty of your Mac.
The Bottom Line
It is an intractable problem when your Mac won’t turn on. And it is more difficult to recover data from an unbootable Mac than that of a working Mac. But you are not helpless. In this post, we work out 4 proven methods you can apply to retrieve your files. And using iBoysoft Mac Data Recovery software is the easiest and quickest way. After recovering the data, you can take further steps to repair the faulty Mac.
