As people are becoming increasingly security aware, VPNs are an essential privacy and security tool that every computer user should have installed on their system. They are handy for watching the full Netflix catalog!
In this guide, we focus on how to properly install and use a VPN on your Mac. If you haven’t already picked one, a list of good VPN services for Mac users can be found here.
Custom macOS VPN software
Undoubtedly the easiest way to set up a VPN on your Mac is to download a VPN provider’s custom macOS app. Almost all VPN services these days offer one, although somewhat annoyingly they are not always as fully featured as their Windows siblings.
Each custom app is different (hey, that’s what the “custom” bit is!), but the installation general follows the following format:
1. Sign up for the VPN service. If you don’t do this first, then you will probably be promoted to at the sign-in stage when you first run the app. Even VPNs which offer a free trial usually like you to register using a valid email address before you can use their service.
2. Download and install the custom client just as you would any other macOS software. This usually means downloading a .dmg file, double-clicking it, and flowing the prompts.
3. Run the app and sign-in using your account details (see step 1). macOS will almost certainly ask you to Allow changes to its network settings, and possibly also to Allow the app keychain access.
4. Most apps will offer to auto-select a server location for you, or you can choose one yourself. To help you choose, many apps allow you to sort or otherwise mark servers that are particularly suited to a particular purpose, such as privacy, streaming, or P2P downloading.
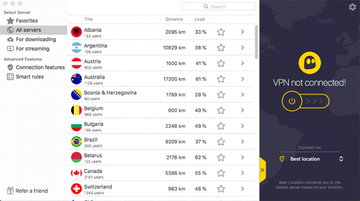
5. One advantage of custom apps over Tunnelblick or the macOS native app (see below) is that they often offer provider-specific features. These are not, however, always enabled by default. So to take advantage of them you must switch them on before connecting to a VPN server.
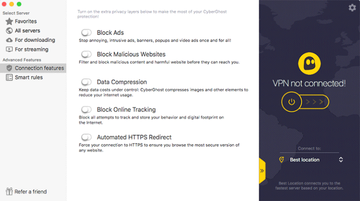
Key features to enable (if they are not so by default) are DNS protection and a kill switch, although the latter is a feature annoyingly missing from many custom VPN apps for macOS. In the case of CyberGhost, above, its support assures us that a kill switch is present and correct, but is (quite rightly) not optional.
Tunnelblick
Instead of using a custom Mac VPN client supplied by your VPN provider you can use Tunnelblick, a free, open source, and fully featured OpenVPN client for macOS that works with any VPN service which offers standard OpenVPN configuration files (which is most of them).
With Tunnelblick you may miss out on provider-specific features, but you do get robust DNS leak protection and good WebRTC leak mitigation. Tunnelblick includes a kill switch, fully routes IPv6 traffic through the VPN tunnel, and always uses the latest version of the OpenVPN protocol (which is something that cannot be said for all custom clients).
1. Signup for a VPN service and download its OpenVPN configuration files. These are usually ovpn files, but .conf files are possible, or even .tbkl (special Tunnelblick files, although these are no longer needed by Tunnelblick).
Each file relates to a particular server or server location. Many VPN services allow you to download multiple configuration files at once as a single .zip file, in which case you will need to unzip them to a folder on your Mac before using them.
2. Download, install and launch Tunnelblick as per any regular macOS app. On the first run, select “I have the configuration files” on the Welcome screen (you won’t need to do this again).
3. Drag the OpenVPN configuration files you downloaded to the Tunnelblick icon in the menu bar. You can drag multiple files at once if you like.
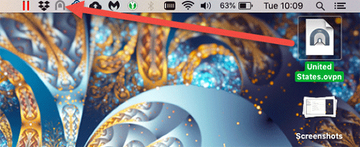
4. You will be asked if you want to install the OpenVPN configuration for all users, or only for you. You will probably also be asked for your Admin password. Once done, a pop-up notification will confirm that the OpenVPN configuration is installed. Yay!
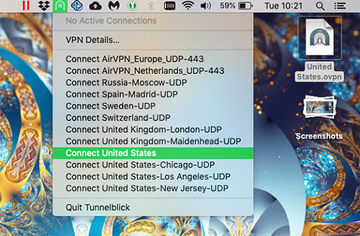
5. Click the Tunnelblick icon in the menu bar and choose a server config that you’ve installed.
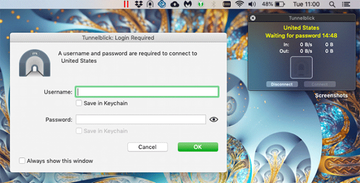
6. You will be asked to provide your VPN account details, which can be saved in Keychain for future use if like. A few VPN providers include account login details inside their custom OpenVPN config files, in which case you will not need to perform this step. Hit “Ok” when you are done.
And ta-da! You are connected. You will receive a notification to this effect, and the Tunnelblick icon in the menu bar will turn dark. If you hover over the icon with your mouse cursor, you can see which server you are connected to, or toy can click on it change server or disconnect.
Additional Tunnelblick settings
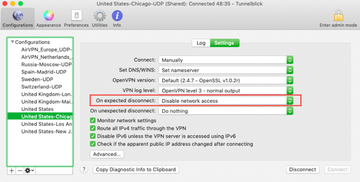
Tunnelblick’s kill switch and DNS leak protection features are not enabled by default. We strongly recommend that you enable them.
7. Click the Tunnelblick icon in the menu bar -> VPN details… In the Configurations tab select a server configuration -> Settings.
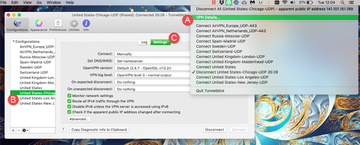
8. To enable DNS leak protection ensure “Route all IPv4 traffic through the VPN” and “Disable Ipv6 unless the VPN server is accessed using Ipv6” are checked.
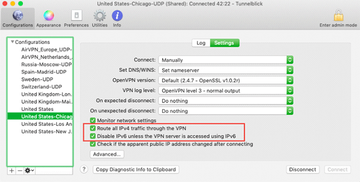
9. To enable the kill switch, select “On unexpected disconnect” -> Disable Network Access.
Manual configuration
Instead of using a third-party client, you can configure the native VPN client that comes integrated with macOS’s Network Settings. This client supports the PPTP, L2TP/IPsec, and IKEv2 VPN protocols. PPTP and L2TP/IPsec are not really recommended these days for security reasons, but IKEv2 is widely regarded as secure and is usually faster than OpenVPN.
The native macOS VPN client provides good DNS leak protection but does not feature a kill switch. Your VPN service will need to provide you with the exact settings needed for each protocol it supports.
1. Go to System Preferences -> Network.
2. Click the + button and select ”Interface”: VPN in the pop-up dialog box. Then select “VPN Type” and pick a VPN protocol supported by your provider. Click Service Name to rename the connection to anything you like, but this is optional
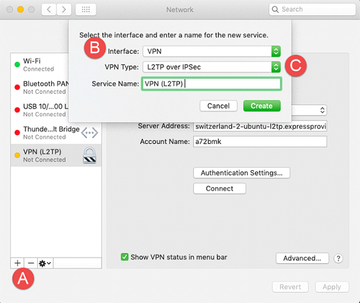
3. Fill in the server and authentication details as supplied by your VPN provider. Then hit Connect!
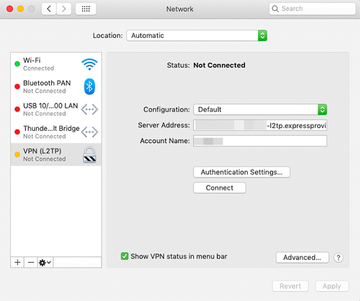
4. A new VPN icon will appear in your menu bar to alert you at-a-glance that you are connected, and which you can click for more details.
Check the VPN is working correctly
To make sure everything is working as it should, visit ipleak.net. Your IPv4 IP address should now appear to belong to the VPN server you have connected to. This means the VPN is performing its most basic task.
If you can see your real IP address (including your real IPv6 address if you have one) or an IP address belonging to your real ISP anywhere else on the page, however, then you have an IP leak. This means that the websites you visit can potentially see your real IP address. even though you are using a VPN. Which is not good, so contact your VPN provider immediately.
It is worth noting that Safari does not support the WebRTC browser feature, and so cannot leak your IP address in this way. Chrome and Firefox, on the hand, do support WebRTC and so are vulnerable to this problem.
