MacBooks are secure machines; they’re specifically designed to be that way. In fact, they’re often praised as being more secure than Windows, which is saying something!
That’s why Macs are a popular choice for companies needing to keep their data safe. However, this is no reason to become lax about your MacBook security measures. Indeed, with cybercrime on the rise, it’s more important than ever to take steps to secure your company's data.
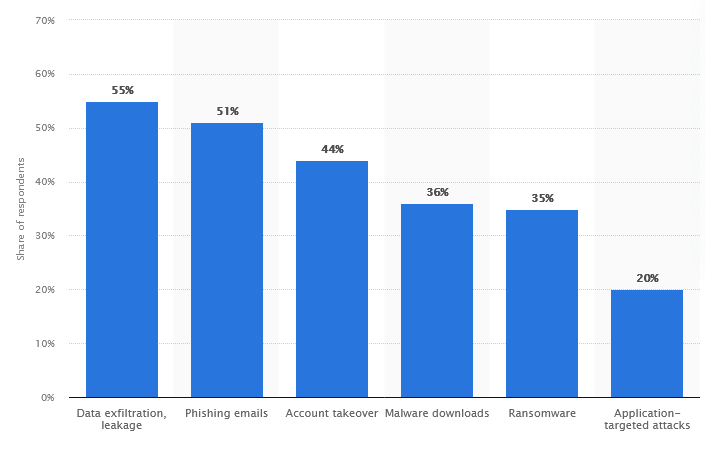
Statista (see the graph below) reveals that data exfiltration and leakage account for 55% of cyber attacks against IT professionals. Exfiltration means “to remove data”. This indicates that cybercriminals are becoming more interested in stealing sensitive information from companies, which is scary stuff indeed!

Image sourced from statista.com
With this concerning statistic in mind, it’s time to consider using advanced security solutions like RealVNC. This is software that allows you to remotely control your MacBook with end-to-end session encryption.
To further enhance MacBook security, companies could also look to hire full stack developers to maintain and improve the security features of the MacBook.
Here are seven other ways to securely use company data on a MacBook.
1. Have one administrator account
If you set up your MacBook, this makes you the administrator by default. Generally speaking, a MacBook only needs to have one of these.
If more than one person is using the machine, a ‘user account’ will suffice for anyone other than yourself. With user accounts, other people can download apps for use on the MacBook, but they cannot change any settings for other users.
In contrast, administrators have full control over the machine. They can add and remove users and change the settings. The more people that have access to these kinds of activities, the less secure the machine is.
To ensure there’s only one administrator on a MacBook, take these steps:
- Choose ‘System Preferences’ in the Apple menu
- Select ‘Users & Groups’ and then ‘Click the lock to make changes’
- Enter your administrative password
- Select any other users that have an administrator account
- Uncheck the box that says ‘Allow user to administer this computer’
- Finally, click on ‘Click the lock to prevent further changes’
Now you’re the only one who can manage the most essential aspects of your MacBook.
2. Keep automatic updates switched on

Free-to-use image sourced from Pixabay
Updates are also vital for maintaining MacBook security. Out-of-date software is a vulnerability, and hackers can access computers and their data through it. That said, now’s a perfect time to check you’ve got your automatic updates switched on.
Here’s how:
- Enter ‘System Preferences’ then click on ‘Software update’
- Click on ‘Advanced’
- Select all the boxes and click ‘OK’
You can also ensure that apps are automatically kept up-to-date:
- Enter ‘System Preferences’ again
- Select ‘App Store’ then click the ‘Enable automatic updates’ button
These are quick and simple ways of adding a vital extra layer of security to your MacBook.
3. Two-factor authentication for iCloud
iCloud is Apple’s very own cloud service. You’ve probably encountered it already if you’re using a MacBook for work purposes and data sharing solutions. The iCloud is a place for users to store, share, and back up their data securely.
Although data is encrypted in iCloud, it’s a good idea to set up two-factor authentication as well. This means that when you log in to your account, you’ll be sent a randomly-generated code to enter before you can access it. This stops unauthorized people from entering your account even if they manage to correctly guess your password.
To set up two-factor authentication:
- Head over to ‘System Preferences’
- Go to ‘Apple ID’ and then ‘Password & Security’
- Select ‘Two-factor authentication’ and ‘Turn on’
- Enter the phone number you want to receive your authentication codes
4. Look at your privacy settings
Privacy threats are a big deal in the online world. Privacy settings include which apps you’ve given certain permissions to. These can include your location and your contacts.
Sometimes, when you download an app or software, it might not be obvious why they request specific permissions. If in doubt, it’s best to deny these.
To optimize MacBook security, review permissions from time to time to ensure you’re still happy with the privacy choices you’ve made. For example, if you downloaded an app that needs access to your calendar but you don’t use it all that much, you might consider removing this permission.
To review what permissions apps currently have on your MacBook:
- Go to ‘System Preferences’
- Click on ‘Security & Privacy’
From there, you can look through your permissions. Simply uncheck any that you don’t want to remain.
5. Set up automatic screen locks
An idle screen is a security risk. People walking past might decide to look through your MacBook and even steal data from it.

Free-to-use image sourced from Pixabay
Automatic screen locks lock your screen automatically after a specified amount of time. A screen saver will be displayed. You’ll then need to enter your credentials before accessing the MacBook again.
Automatic screen locks eliminate the possibility of someone accessing your company’s data when you’re not in front of your computer. Thus, MacBook security is increased.
Like every other tip in this article, you don’t need an ETL engineering certificate to set up automatic screen locks. In fact, it’s really easy to do - just use the following steps:
- From ‘System Preferences’, go to ‘Security & Privacy’
- Click on ‘General’
- From there, click on ‘Click the lock to make changes’ and enter your password
- In the bottom right-hand corner, you’ll find the ‘Advanced’ button. Click this
- You’ll be presented with a page where you can choose to log out after a specified time.
6. Use Mac’s built-in firewall
Stopping malware in its tracks before it affects your machine is easier than removing malware from your MacBook. Even though MacBooks have a built-in firewall, this is switched off by default.
This firewall blocks malware from your machine and essentially stops hackers from connecting to your network. To manually switch this security-boosting feature on:
- From ‘System Preferences’, select ‘Security & Privacy’
- Click ‘Firewall’
- Then ‘Turn On Firewall’
That’s it. You’re all done.
There are also more advanced options for managing Mac’s Firewall, but its default settings are fine for most purposes.
7. Find My Mac
Finally, just as security should be your top priority when you search domain names and create a website or develop a schema database model, Find My Mac is an invaluable MacBook security feature that every MacBook owner should use. If your device gets lost or stolen, you can simply view its location on a map in your iCloud account.
Additionally, you can lock your computer remotely and even remove data if necessary. This means that if your MacBook is stolen, neither your files nor the machine can be accessed.
- From ‘System Preferences’, click on ‘Apple ID’
- Click on ‘iCloud’ in the side menu
- Check the box which says ‘Find My Mac’ on the list of displayed apps, before clicking ‘Allow’
Now you’ll be able to locate and manage your device remotely.
Using these seven tips is a good start to securing your company data on your MacBook. However, for added security, you may wish to secure your Mac with AstrillVPN to encrypt your online traffic and protect your data from cybercriminals.
Conclusion
MacBooks come complete with an impressive list of security features. Unfortunately, not everyone knows how to manage them or even that some of them exist.
With these security measures, you can be sure you’re keeping company data as safe as possible. Use the advice shared in this article to make the most of all the security-enhancing features available to you and your MacBook.
