Although fixing the DNS Unlocker ads problem on a Mac is a challenging task to fulfill, this post will guide the infected users away from the adware jeopardy.
The Mac operating system is so much safer than Windows in a ton of ways, but its defenses aren’t even close to flawless. To its credit, OS X is strongly protected against malicious code by means of rigorously monitoring what apps are allowed to be installed and run on a box. This feature, however, doesn’t seem too big of an obstacle to malware publishers. The product dubbed DNS Unlocker proves that the bad guys are starting to really succeed across computer platforms. It is, essentially, an adware pest that appears to be quite commonplace on the outside, but a little bit of reverse engineering shows what a misperception this is. Aside from the disruption on a browser-only level, its effect expands over to DNS server settings.
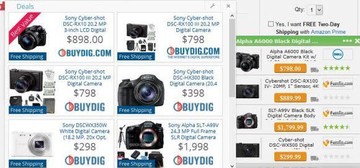
The user queries currently trending with regard to this infection include “Ads by DNS Unlocker removal from Mac” and “DNS Unlocker virus”, which indicates that people are mostly annoyed by redundant advertising. Indeed, the virus turns out to be involved in a malicious pay-per-click affiliate model, where software recommendations, deals, best buys, coupons and comparison shopping data are blatantly inserted into every website that the victim visits. Users will also see regular textual elements on pages go capitalized, with hyperlinks being automatically built in. This frustrating activity is difficult to bring to a standstill, because there is some deep system configuration toggling that must be performed.

Interestingly, the DNS Unlocker application itself is backed by an idea that would otherwise be commendable. It is claimed to help its customers access geo restricted sites by proxying the metadata associated with one’s actual location. Given this feature, it’s not beyond the realms of possibility that some Mac users install it as an instrument to circumvent sandboxing by services like ESPN, Spotify and the like in places where these are unavailable. Most of the victims, though, get infected when installing free apps with a hidden DNS Unlocker bundle on board.
Ads by DNS Unlocker are extremely persistent as they are displayed on all sites regardless of their category. The first and, obviously, correct troubleshooting ideas that come to mind in these circumstances is to trash the application proper and restore the web browser defaults. These actually are on the victim’s agenda, but additionally, some critical values constituting the network adapter configuration should be manually changed.
DNS server settings troubleshooting on Mac
1. Go to the Apple menu and select System Preferences
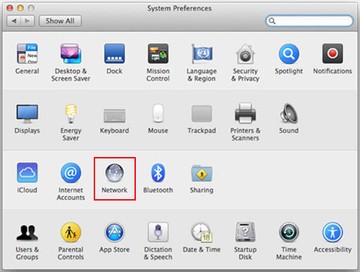
2. Proceed to Network
3. Click the icon for your currently used network adapter in the left-hand pane and select Advanced
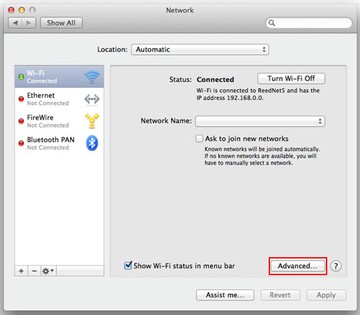
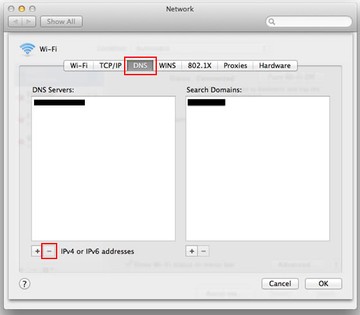
4. Hit the DNS tab
5. The DNS server address displayed in the respective field should be removed by clicking the "minus" button at the bottom. This being done, the network will automatically assign the correct values instead of the ones previously imposed by DNS Unlocker.
DNS Unlocker ads manual removal for Mac
To begin with, settings for the web browser that got hit by DNS Unlocker virus should be restored to their default values. The overview of steps for this procedure is as follows:
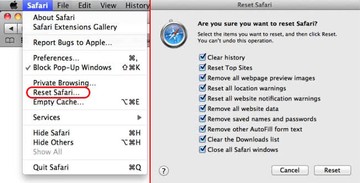
1. Reset Safari
• Open the browser and go to Safari menu. Select Reset Safari in the drop-down list
• Make sure all the boxes are ticked on the interface and hit Reset
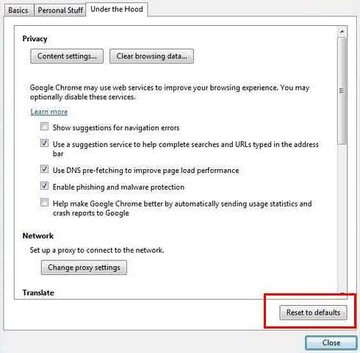
2. Reset Google Chrome
• Open Chrome and click the Customize and Control Google Chrome menu icon
• Select Options for a new window to appear
• Select Under the Hood tab, then click Reset to defaults button
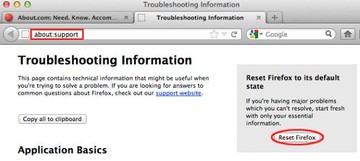
3. Reset Mozilla Firefox
• Open Firefox and select Help – Troubleshooting Information
• On the page that opened, click the Reset Firefox button
Get rid of DNS Unlocker virus using Combo Cleaner automatic removal tool
The Mac maintenance and security app called Combo Cleaner is a one-stop tool to detect and remove DNS Unlocker ads virus. This technique has substantial benefits over manual cleanup, because the utility gets hourly virus definition updates and can accurately spot even the newest Mac infections.
Furthermore, the automatic solution will find the core files of the malware deep down the system structure, which might otherwise be a challenge to locate. Here’s a walkthrough to sort out the DNS Unlocker ads issue using Combo Cleaner:
Download Combo Cleaner installer. When done, double-click the combocleaner.dmg file and follow the prompts to install the tool onto your Mac.
By downloading any applications recommended on this website you agree to our Terms and Conditions and Privacy Policy. The free scanner checks whether your Mac is infected. To get rid of malware, you need to purchase the Premium version of Combo Cleaner.
Open the app from your Launchpad and let it run an update of the malware signature database to make sure it can identify the latest threats.
Click the Start Combo Scan button to check your Mac for malicious activity as well as performance issues.
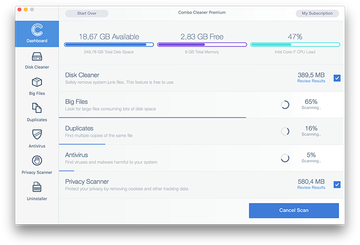
Examine the scan results. If the report says “No Threats”, then you are on the right track with the manual cleaning and can safely proceed to tidy up the web browser that may continue to act up due to the after-effects of the malware attack (see instructions above).
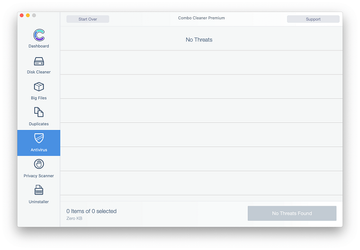
In case Combo Cleaner has detected malicious code, click the Remove Selected Items button and have the utility remove DNS Unlocker ads threat along with any other viruses, PUPs (potentially unwanted programs), or junk files that don’t belong on your Mac.
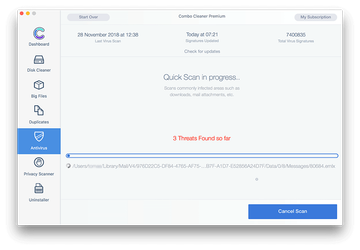
Once you have made doubly sure that the malicious app is uninstalled, the browser-level troubleshooting might still be on your to-do list. If your preferred browser is affected, resort to the previous section of this tutorial to revert to hassle-free web surfing.
