Find out why the Mac external hard drive read-only error occurs and discover the right solutions that can be used to resolve this problem on your machine.
The “Mac external hard drive read-only error" is a frequently reported bug that occurs whenever a user faces an issue in modifying or writing files within the external hard drive. If they are unable to perform the action, it indicates that the hard drive is not writable. Usually, the reasons underlying this error include permission restrictions on the Mac or incorrect and incompatible file systems.
With such root causes in highlight, you might seek ways on how to fix the Mac external hard drive read-only error. This article provides you with the relevant solutions that will help you emerge unscathed from this particular predicament.
Part 1: Why Mac external hard drive read-only error occurs
Part 2: Solutions to fix external hard drive read-only on Mac
Part 3: Preventing read-only errors in the future
Part 1: Why Mac external hard drive read-only error occurs
We will direct our discussion to find the reasons that cause the Mac external hard drive read-only error. An understanding of these whys and wherefores will help you come up with the right solution that will tackle this particular restriction of writing and modifying files within the external hard drive.
Checking the hard drive format
First things first, you will need to check the hard drive format of your external storage medium to verify the reason why you are facing the issue within your Mac. There are many types of hard drive formats existing within devices, where they are restricted to be either optimized for Windows, Mac, or both. These file system formats are not limited to these operating systems but also tend to support other platforms.
A few of the most commonly used file system formats are NTFS, HFS+, APFS, exFAT, and FAT32. Some of these are adapted for the major operating systems. For Mac devices, the APFS (Apple File System) is the standard supported file system. However, you can also consider using the HFS+, exFAT, and FAT32 file systems as they are compatible with the device as well.
A few of the most commonly used file system formats are NTFS, HFS+, APFS, exFAT, and FAT32. Some of these are adapted for the major operating systems. For Mac devices, the APFS (Apple File System) is the standard supported file system. However, you can also consider using the HFS+, exFAT, and FAT32 file systems as they are compatible with the device as well.
How to check the hard drive format on Mac?
Since you might be trying to find a proper way to check the file system format for the external hard drive on your Mac, the following steps will point you in the right direction:
Step 1: Open Finder from the Dock of your Mac and proceed to the "Applications" folder from the left-hand sidebar. Pick the “Utilities” directory and look for "Disk Utility" on the following screen.
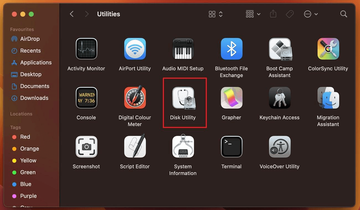
Step 2: As it opens, look for the external hard drive in the sidebar and check the hard drive format appearing under its name on the main screen.
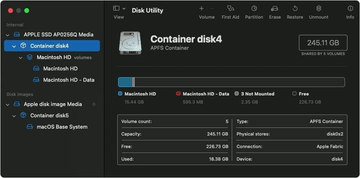
Inspecting permissions and sharing settings
There are set permissions specified for every file, folder, and drive within a Mac. To manage the files and folders properly, you can define particular permissions and sharing settings that can help you avoid undesirable changes within the file, folder, or drive.
For a drive that has reading permissions only, you can’t do anything except viewing the files and elements it hosts. However, if there are write permissions granted to it, this allows the user to add, remove, and edit files within it effortlessly.
How to check permissions on Mac?
If you are willing to verify the permissions defined on a particular drive within your Mac, stick to the following steps for a better understanding of the process:
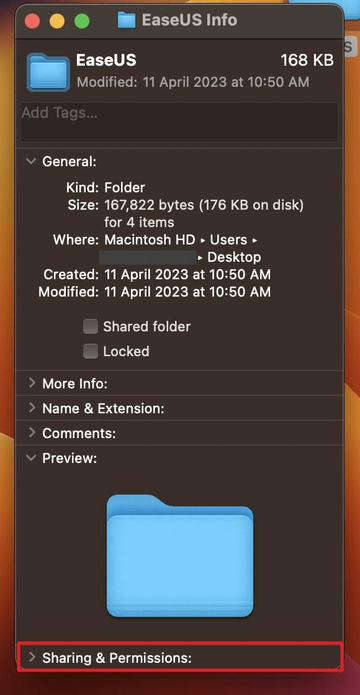
Step 1: To check the permissions of a specific file, folder, or drive on Mac, you should simply select it and navigate to the "File" tab at the top. Select "Get Info" from the drop-down to proceed. You can also use the "Control + Click" key combination to open a pop-up displaying the "Get Info" details.
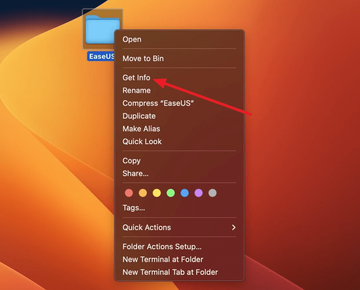
Step 2: Scroll down to find the “Sharing & Permissions” section and expand it. You can now view the permissions assigned to the particular hard drive.
Potential issues with sharing settings
While you can check the permission settings for a particular file, directory, or drive, these configurations can be a source for some issues. As you are facing the Mac external hard drive read-only error, you should be aware that some of these inconsistencies might be the culprits causing this problem. The silver lining is that this will eventually assist you in coming up with the right fix:
• Conflict in permissions: If you have provided access to multiple users on a file and folder, issues can occur while it is being accessed or modified. This condition can trigger numerous errors, including the one under scrutiny.
• Incorrect settings: As you are trying to determine the reasons for the particular read-only error with your hard drive, the "Sharing Settings" need to be appropriately configured. The issue has close ties with the incorrect settings specified on the Mac.
• No permissions granted: There is a potential chance that the user might not have given permission access to anyone within the external hard drive. As a result, everyone who accesses the drive has restricted access.
Part 2: Solutions to fix external hard drive read-only on Mac
We will now move on to the effective solutions that can guide you on how to fix the Mac external drive read-only error. For this article, our focus revolves around four exceptional solutions which can be tried to gain unrestricted access to an external hard drive on Mac.
Reformatting the external hard drive
The first solution that’s worth a shot for resolving the issue with the Mac external drive read-only error is to reformat the drive itself. However, before you proceed with this, back up the external hard drive to save all the data that resides on the external drive. After you have backed it up, proceed with the specific steps of reformatting the external hard drive on your Mac:
Step 1: Access Finder on your Mac and head to the “Applications” section on the left panel. Proceed into the “Utilities” folder and look for “Disk Utility” in the available options as illustrated below.

Step 2: Once you end up on a new window, choose the external hard drive in the left-hand panel and tap the “Erase” button on the top. You might have to change the “View” settings at the top to view the external hard drive.
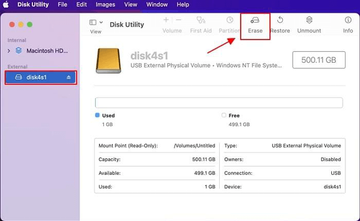
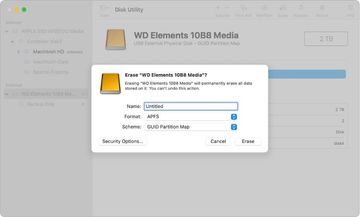
Step 3: This will open the reformatting settings, where you’re supposed to specify appropriate details for the drive after it formats. Set the file system to APFS, HFS+, or exFAT, which are the supported file system formats across the Apple environment. Change the "Scheme" settings to "GUID Partition Map" and click “Erase” to complete the process. Once you are done reformatting the external hard drive, you can easily restore all data to the drive.
Using third-party software to enable NTFS Write support
Another option that you can opt to resolve the problem of external hard drive read-only errors on your Mac is to use third-party software that helps enable the NTFS Write support on the Mac. Chances are that the file system format of your external hard drive is set to NTFS, which explains why you are experiencing the issue in question. Third-party software like EaseUS NTFS for Mac, Paragon NTFS for Mac, Tuxera, and many more services are tailored for this particular purpose.
Pros and cons of using third-party software to enable NTFS Write support on Mac
Before you try using a specific third-party application on your Mac to enable the NTFS Write support on the device, go over the following pros and cons to make an informed decision:
Pros
- It helps make your Mac compatible with file systems that it normally does not support.
- The process is exceptionally cost-effective compared to buying devices supporting the NTFS file system.
- The tools are straightforward in terms of usability, so people prefer resorting to them for good reason.
Cons
- There is a potential chance of putting your Mac at security risk if you do not use a proper tool.
- It is possible that the performance of your Mac slows down with the installation of third-party software.
Steps to use third-party software to enable Write support on Mac
For this tutorial, we will use EaseUS NTFS for Mac to enable writing support on Mac. This will surely help you out in assessing the method of how to perform such an action:
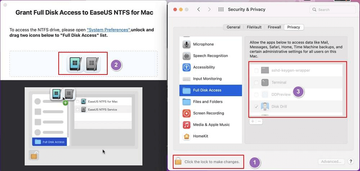
Step 1: Launch the software and connect the external drive with the NTFS file system to your Mac. Once the tool detects the storage medium automatically, tap the "Enable Writable" option to add writing privileges.
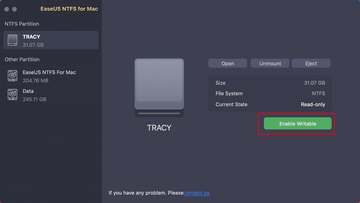
Step 2: The app automatically performs the task and changes the state of the drive to "Writable." You will be prompted to provide "Full Disk Access" to the external hard drive. After the software restarts, you will have the right support for your external hard drive.
Modifying permissions and sharing settings
Another option is to try to modify the "Sharing & Permissions" settings on your Mac as a way to prevent the external hard drive from showing the read-only error. Apart from being related to file format issues, the problem can stem from peculiar permission and sharing settings. To get around this hurdle, follow the simple steps provided next:
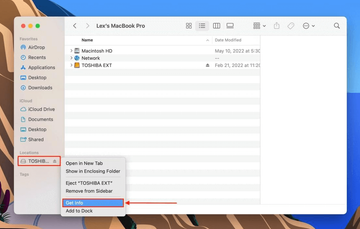
Step 1: To change the permissions and sharing settings for a specific external hard drive, open Finder on your Mac and access the external hard drive in the sidebar. Use the "Control + Click" combination and "Get Info" option in the drop-down menu to open the drive details. You can also use the "Command + I" shortcut keys to open the drive information window.
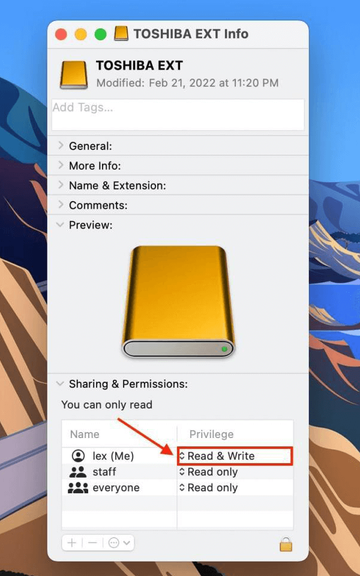
Step 2: Scroll down to expand the “Sharing & Permissions” section. Take a look at the privilege settings for the users who are authorized to view the particular external hard drive on the Mac. You can click on the specific settings and change them on the drop-down that appears.
Potential limitations of changing drive permissions and sharing settings
There are a few limitations of taking this route to resolve the Mac external hard drive read-only error, which are provided below:
- This can wreak havoc with the current settings of the drive and can cause multiple anomalies, which might put the data at risk.
- You can face conflicts with third-party applications after changing the permission and sharing settings of the external hard drives.
Using Terminal commands to enable NTFS Write support
Terminal provides native command line functionality for managing the system-level settings of the Mac. While this can be used for many purposes, it can be an excellent option for enabling the NTFS Write support on the machine. If you know how to use the Terminal on Mac properly, you can follow the steps listed below:
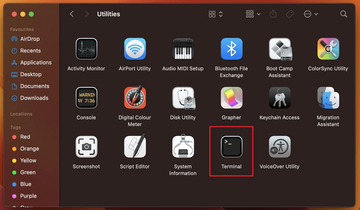
Step 1: Open Finder and look for “Applications” on the left panel. Continue into the “Utilities” folder and open “Terminal” in a new window.
Step 2: For editing the fstab file on your Mac, use the following command: sudo nano /etc/fstab

Step 3: Enter the admin account name and password in the subsequent prompt to continue with the process. Once done, you’ll need to run the command below in the Terminal to turn on NTFS Write support for the external hard drive. Be advised you must replace the "DISKNAME" value with the name of your external hard drive:
LABEL=DISKNAME none ntfs rw,auto,nobrowse
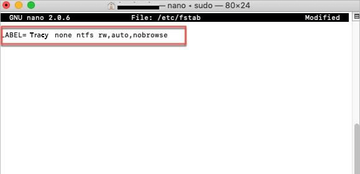
Step 4: Unplug and reconnect the external hard drive to your Mac and continue using it without any read-only restrictions.
Part 3: Preventing read-only errors in the future
Whereas you are now aware of multiple solutions that can help you understand how to fix the external hard drive read-only error on your Mac, some tips can help you avoid this error in the first place. Follow these tips to steer clear of this problem on your machine in the future:
Select the right file system format
The first thing you should remember is that the Mac only supports APFS, HFS+, and exFAT file systems. Remember that the file system format of your external hard drive should be one of these, which is a prerequisite for being able to easily access and write to the drive.
Properly eject the hard drive
Whenever you use the external hard drive on Mac or on any other device, a rule of thumb is to properly eject the hard drive using its settings. If you abruptly remove it, there is a chance that it might get corrupted or restricted for what appears to be no particular reason.
Update software and drivers
You should ensure that the software and drivers on your Mac and on the external hard drives are up to date at all times. If you do not update them regularly, there is a potential chance that bugs and anomalies within the software and drivers may lead to such errors on your Mac.
Conclusion
This article has covered several effective solutions that can be used to resolve the Mac external hard drive read-only error, from tweaking the permissions to installing third-party software to provide NTFS file system support on Mac. You can consider using the Terminal or reformatting the drive as one of the ways to address this noxious condition as well. However, if you still feel a particular problem exists on your Mac, consider getting assistance from a professional.
