This article explains what a symlink is and provides a step-by-step guide on the different ways to create and remove symlinks on Mac.
What is a symlink on Mac?
A symlink (symbolic link) is a file that the operating system interprets exactly as another file or folder located in a different place. This principle is similar to the way aliases work, but symlinks have more functionality under the hood. Unlike aliases, which are in essence primitive shortcuts for files or programs, they can operate seamlessly at the level of any application on your Mac, including advanced command-line utilities such as Terminal. One of the scenarios where this peculiarity plays into your hands is when an app acts finicky with a garden-variety alias, which isn’t a rare situation. Things get smooth if you create a symlink, because the system will then redirect and handle all the associated workflows and data in an absolutely frictionless fashion.

That said, a symbolic link denotes the actual linked-to entity to a much greater extent than a simple shortcut. Metaphorically, it’s like reducing background noise in audio recordings to get a clearly discernible output. This can be very useful if you want to change the folder that a specific application uses to save its data. It’s as simple as creating a symlink that reassigns the file storage flow from the program’s original folder to a new place. This way, every time the app tries to access its default directory, macOS will reroute it to the new one. From the perspective of the program, nothing changes. But all the files end up where you want, with zero lagging and errors.
Those of you familiar with aliases know that they can be created using the regular Finder menu. Making a symlink is a bit more tedious than that – you’ll need to execute a specific command in Terminal. This, in turn, requires that you know the accurate strings for both the original file location and that of the destination spot on your Mac where you want the new object to appear. Symbolic links are created using the ln -s command line argument.
If you are planning to use symlinks a lot, there is a way to streamline the process by adding an option to the contextual menu that appears as you right-click any file or folder. Let’s go over all the methods to create and remove symlinks on your Mac without having to install a third-party application. You will also learn a few tips and tricks that make things easier, such as a technique to auto-fill file paths in the command-line utility instead of typing them, add a quick action via the Mac’s built-in Automator tool to complement the standard Finder menu with a user-friendly symlink feature, and more. Here we go.
Create a symlink using the Terminal
• Use the Command (⌘) + Space bar key combination to open Spotlight, the Mac’s search feature. Type “terminal” in the Spotlight Search field and press Enter once the top entry (the most appropriate one) is highlighted.

• On a side note, the alternative way to access Terminal is to open the Go list in the Apple menu bar, select Utilities, and right-click (aka control-click) the Terminal icon.

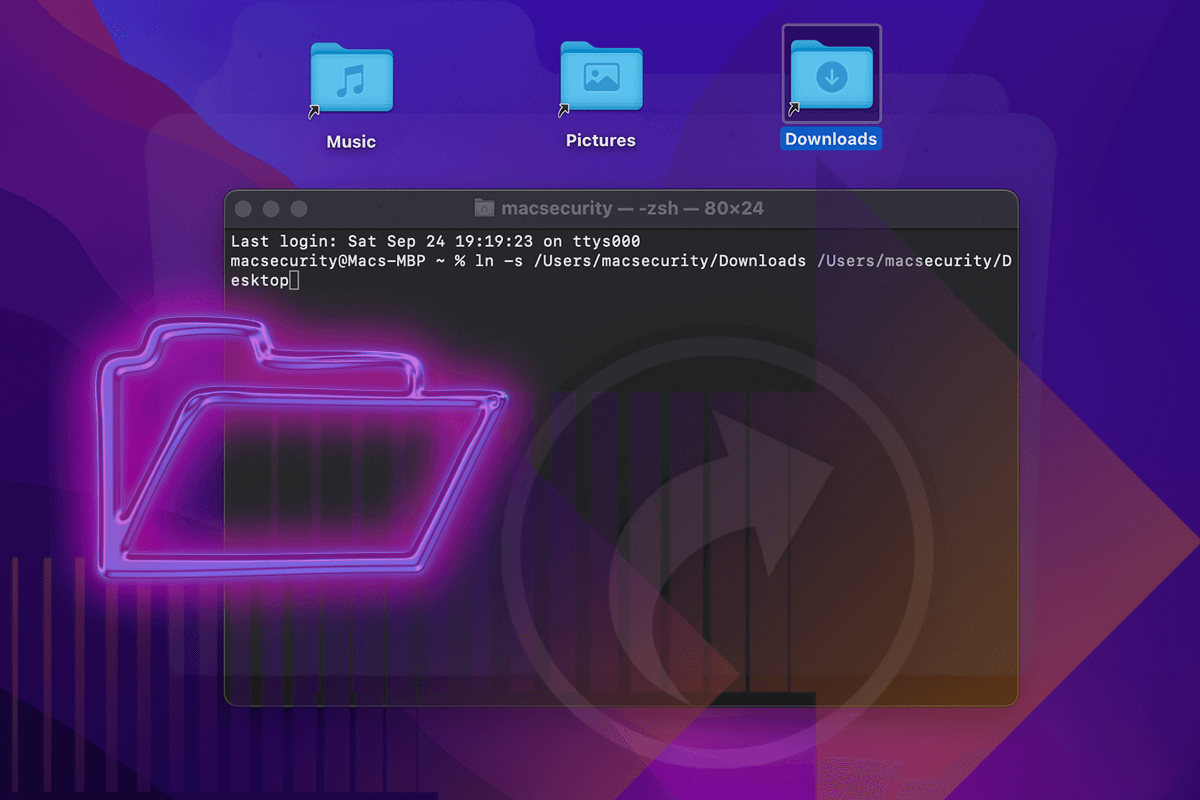
• Type a command in the following format: ln -s /original location /destination location. For example, if I need to create a symbolic link for my Documents folder on the Desktop, the line is going to be as follows: ln –s /Users/admin/Documents /Users/admin/Desktop. Press Enter to create the symbolic link.

• Now you’ll see the symlink exactly where intended – in my case, it ended up on the Desktop.

• In case the original path or destination path has spaces or special characters in its name, you’re better off using quotation marks to avoid errors. For instance, if I’m up to making a symlink for a subdirectory in my Downloads folder named “Weekly reports”, I’ll need a command like this: ln -s "/Users/admin/Downloads/Work/Weekly reports" "/Users/admin/Desktop/All reports" (see screenshot below).

• Another way to enter paths for creating symbolic links is to drag files or folders from directories over to the Terminal window. Doing so will auto-fill the location details.
![]()
Making symbolic links with the help of the Terminal tool is easy, but this method may not be suitable if you need to create lots of symlinks as part of your day-to-day work rather than once in a while. There is a handier option that I’m going to describe further down.
Add a Finder menu option to create symlinks in one click
Whenever you control-click any file or folder on your Mac, you’ll see a contextual menu with the most common available options. Copying, pasting, sharing, making an alias, or deleting a selected item are among them.
If you are looking for a quicker way to spawn symlinks, just add the right option to this menu using the Automator utility. This will literally bring the feature to your fingertips. Some of you might find the process a bit complex, but the result is worth the effort. Here’s is how you do it:
• Press the Command (⌘) key and Space bar simultaneously to bring up Spotlight. Type “automator” in the search area and hit Enter once the appropriate suggestion appears in the list.

• Click New Document.

• Select Quick Action in the document type area and click the Choose button.

• For the setting called “Workflow receives current”, specify files or folders and make sure any application is selected right next to it.

• Find a sidebar entry called Run Shell Script (in the “Actions” area) and drag it to the main part of the window.
• Expand the list of options next to the “Pass input” setting of the just-added action and select as arguments. Then, type or paste the following script:
while [ $# -ne 0 ]; do
      ln –s "$1" "$1 symlink"
      shift
 done

• In the Automator menu bar, select File and click the Save option in the list. Enter a name for this quick action (e.g. “Create Symlink”) and click Save.

• As the screenshot below illustrates, a quick option to create a symlink has been added to your Finder menu. That’s hugely convenient, isn’t it?

• If, for whatever reason, you want to remove this option from the contextual menu, there are several ways to do it. One of them is to open the ~/Library/Services directory, find the symlink service you previously created, and move it to the Trash.

• Another method to delete the symlink service from the contextual menu is to open System Preferences, select Extensions, click Finder, uncheck your quick symlink option in the main panel, right-click it, and then select Move to Trash.

How to remove a symlink on Mac
There are two ways to get rid of a symbolic link. One is to run a specific command in Terminal, and the other is to simply send it to the Trash. Let’s go over both methods.
• Open the Terminal utility and enter a line in the following format: rm /symlink location. For instance, to remove the previously added symbolic link on the Desktop for my Documents folder, I’ll need to type the following command: rm /Users/admin/Desktop/Documents and hit Enter.

• Those of you who aren’t very comfortable with Terminal commands can use the good old regular method: right-click the symlink you want to remove and select Move to Trash. Be sure to empty the Trash folder when you’re done, though.

To recap
Symbolic links might be a bit complex to get the hang of, but once you’ve learned the nuts and bolts of creating and using them, you’ll realize how incredibly useful they can be in some scenarios. Pick the option that suits you the most and explore the power of this feature to the fullest.