Quick Mac Fixer is a rogue system utility whose optimization claims are at odds with the havoc it wreaks, so it should be removed from a MacOS without delay.
| Threat Profile | |
|---|---|
| Name | Quick Mac Fixer (Quick MacFixer, QuickMacFixer) |
| Category | Mac malware, scareware, PUA |
| Related Domains | quickmacfixer.com, quickmacbooster.com, easymaccare.com |
| Detection | Bitdefender: Application.MAC.QuickMacFixer.A, Emsisoft: Application.MAC.QuickMacFixer.A (B), MAX: Malware (ai Score=89) |
| Vulnerable Devices | MacBook Air, MacBook Pro, iMac, Mac Pro (all MacOS versions) |
| Symptoms | Displays fake scan results and follow-up alerts, causes system slowdown, hampers regular removal |
| Distribution Techniques | Freeware bundles, booby-trapped software updates, misleading popup ads, spam |
| Severity Level | High |
| Damage | Bogus scan results promoting product license, browser hijacking |
| Removal | Scan your Mac with Combo Cleaner to detect all files related to the malware. Use the tool to remove the infection if found. |
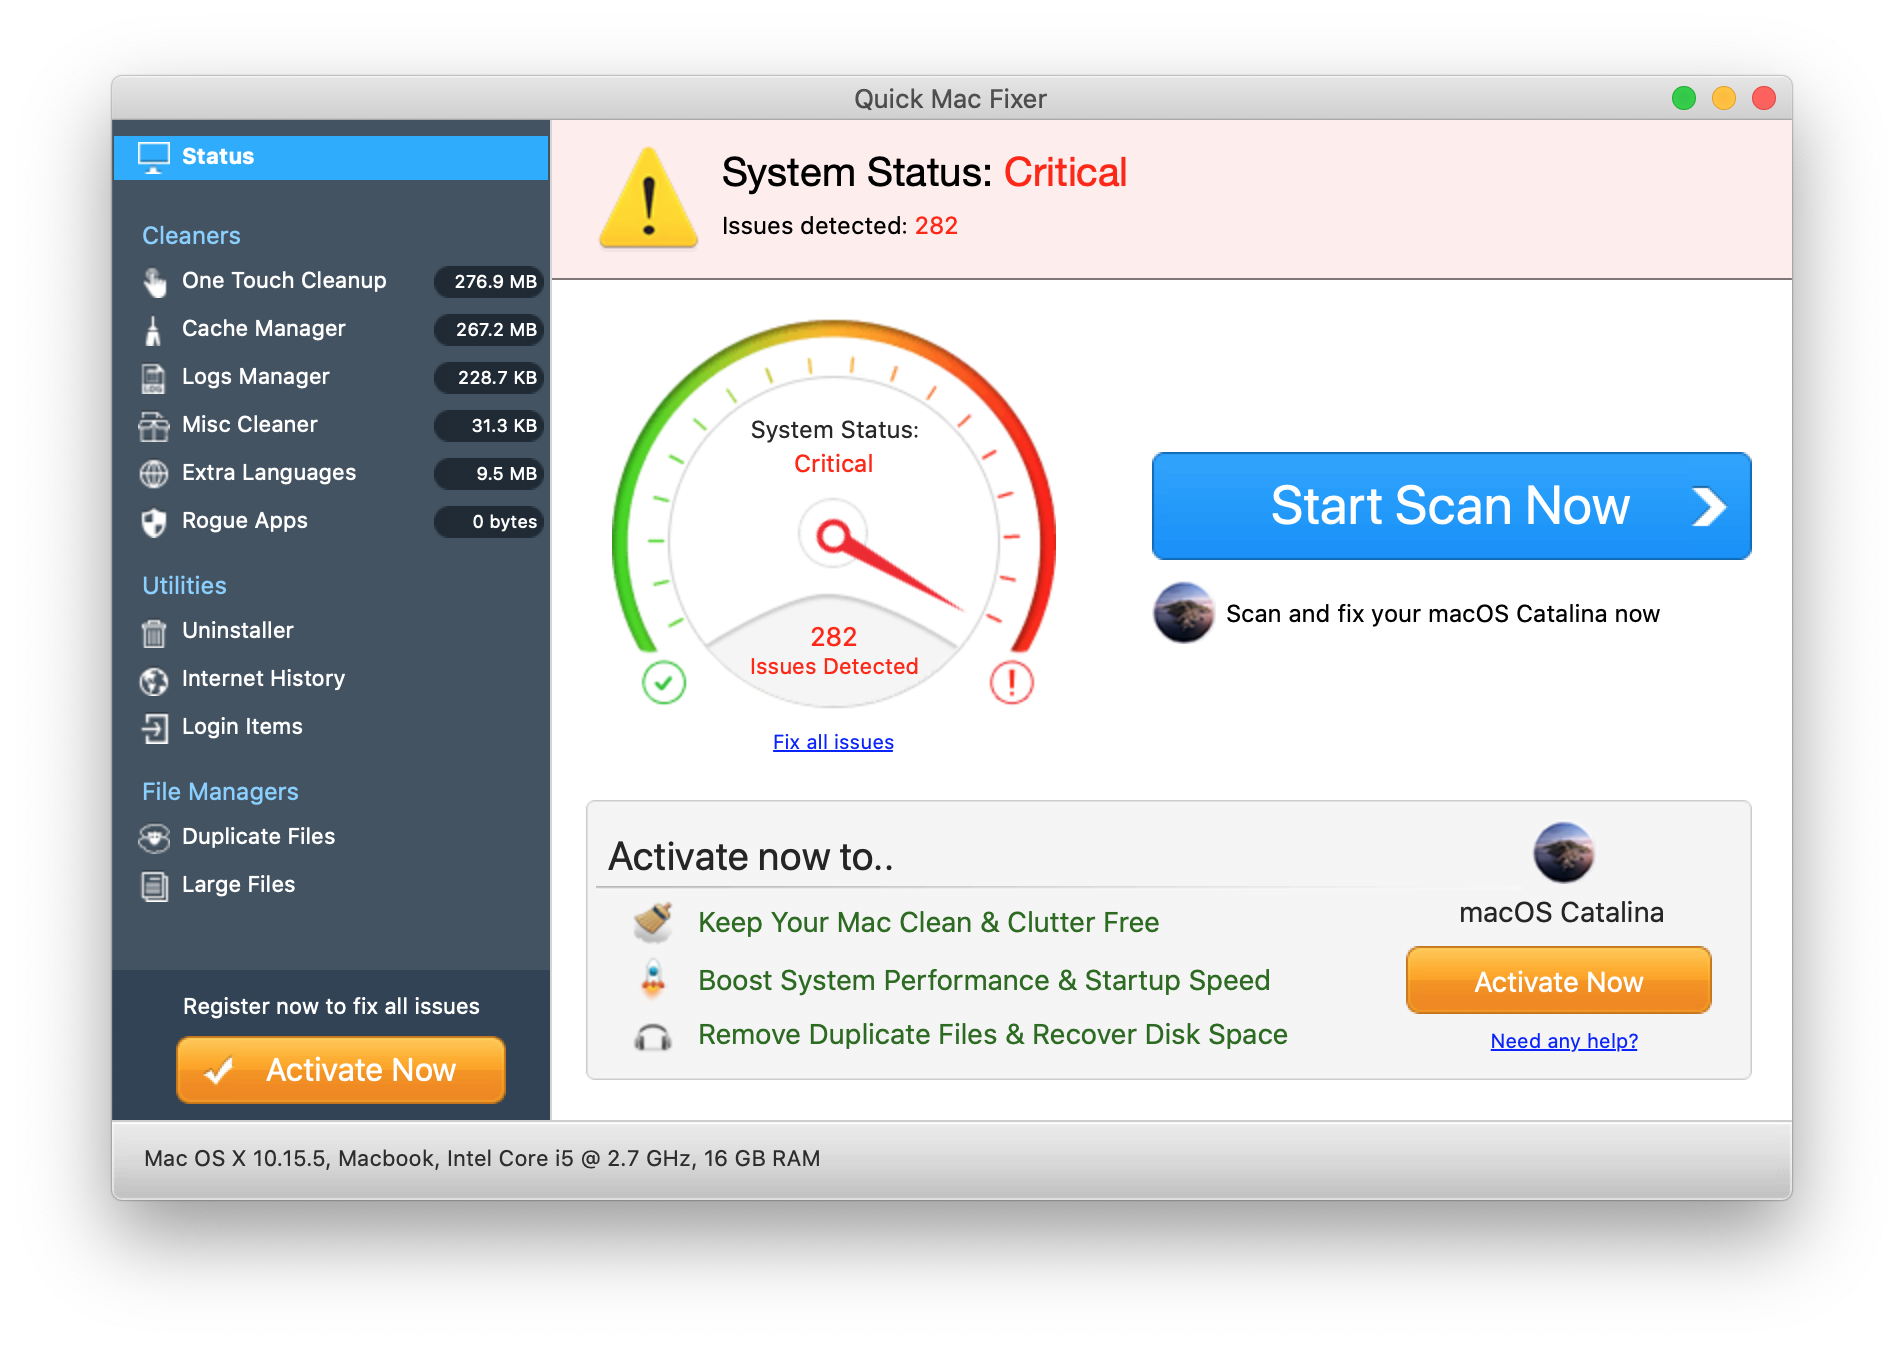
Cleanliness of a computer system isn’t only a condition. It’s also a continuous process that requires quite a bit of the user’s attention, time, and effort. A few examples of every Mac’s areas that need periodic tidying include caches, Internet history, logs, and unused languages. Obliterating superfluous items releases disk space and contributes to better performance of the machine overall, but this routine can be a challenge to perform. The app called Quick Mac Fixer claims to automate the whole process, but with the caveat that its activity is accompanied by exaggerated improvement potential notifications and follow-up alerts. Instead of finding and deleting clutter for real, it ends up deploying a major brainwashing stratagem aimed at one thing – bilking the user of a registration fee that supposedly unlocks its cleanup features.

Just like its clone scareware called Quick Mac Booster, this culprit builds its hoodwinking strategy around fake scans. A big giveaway in this regard is that it takes the program mere seconds to check the whole Mac for different kinds of junk. Obviously, no authentic monitoring can be executed that fast on a machine with several hundred gigabytes of disk space onboard. This inconsistency suggests that the scan is nothing but a dummy element that seeks to get the victim on the hook as fast as possible. An extra component of the scare tactic is a female voice saying “Scan has completed. Warning! Issues have been detected that need your immediate attention. Click on ‘Clean Now’ to fix these issues.” The message comes from the Mac’s built-in speakers and sounds spooky, to be honest. This is exactly what Quick Mac Fixer operators are cashing in on: the bogus app imposes pressure to make the confused user rush headlong into repairing whatever is “broken”.

At that point, several red severity meters on the “One Touch Cleanup” screen, mixed with dozens of issues and a plethora of unnecessary data supposedly found in every inspected area, add up to the illusory doom and gloom impression. Sober-thinking users who suspect something wrong and decide to close the app will be interrupted by an additional popup ad emphasizing its pseudo-benefits and insisting on immediate activation of the product. Although the “No Thanks” option seems to quit the program and get its screen out of sight, the underlying binaries continue to run in the background. They are manifested as Quick Mac Fixer proper and “qmfxrhlpr” in the Activity Monitor. The latter, apparently, denotes a helper component that allows the dubious app to keep its grip tight.

To make sure the bad impact survives reboots and lasts throughout every computing session, the pest creates a namesake entry in the Login Items. One more secret of its persistence comes down to a footprint in multiple system paths, including the LaunchAgents, Application Support, and LaunchDaemons. That's in addition to the obvious presence in the Dock and the Applications screen. In some scenarios, the threat adds a new configuration profile that paves its way towards unauthorized domination in the victim’s preferred web browser. No matter if it’s Safari, Mozilla Firefox, or Google Chrome, the fishy device profile will twist the custom web surfing settings such as the default search engine, homepage, or new tab page. The purpose of doing this is to redirect a non-paying victim to counterfeit warning sites that try to magnify the intimidation effect. Deceptive landing pages that say, “Your Mac is infected with 3 viruses” exemplify a notorious hoax of that kind.

Quick Mac Fixer malware is nothing out of the ordinary in terms of the distribution vectors it follows. The stronghold of its propagation is unethical bundling, a long-standing controversial technique that combines benign applications with harmful ones within the same wrapping. In this case, the user may firmly believe they are about to install some program with awesome bells and whistles built in. Meanwhile, a dangerous payload will sneak inside the Mac along the way and start doing its abominable thing without asking for permission. This social engineering trick often involves fake Adobe Flash Player updates and cracked versions of popular software distributed via torrent resources. One way or another, the contamination is cloaked underneath an ostensibly normal installer.
The good news is, Quick Mac Fixer virus is trivial to avoid – all it takes is saying no to the default installation option in situations described above. The custom setup is so much more verbose, listing all the apps being pushed under the same umbrella. The bad news, though, is that many users ignore proper online hygiene and unwittingly allow the scareware to infiltrate their Macs. If the covert electronic intrusion has taken place and the junk utility is deluging the system with its phony scans, a series of tried-and-tested removal techniques will sort things out.
Quick Mac Fixer virus manual removal for Mac
The steps listed below will walk you through the removal of this malicious application. Be sure to follow the instructions in the specified order.
- Expand the Go menu in your Mac’s Finder bar and select Utilities as shown below.

- Locate the Activity Monitor icon on the Utilities screen and double-click on it.
- In the Activity Monitor app, look for Quick Mac Fixer, qmfxrhlpr, or another process that appears suspicious. To narrow down your search, focus on unfamiliar resource-intensive entries on the list. Keep in mind that its name isn’t necessarily related to the way the threat is manifesting itself, so you’ll need to trust your own judgement. If you pinpoint the culprit, select it and click on the Stop icon in the upper left-hand corner of the screen.
- When a follow-up dialog pops up asking if you are sure you want to quit the troublemaking process, select the Force Quit option.
- Click on the Go menu icon in the Finder again and select Go to Folder. You can as well use the Command-Shift-G keyboard shortcut.
- Type /Library/LaunchAgents in the folder search dialog and click on the Go button.
- Examine the contents of the LaunchAgents folder for dubious-looking items. Be advised that the names of files spawned by malware may give no clear clues that they are malicious, so you should look for recently added entities that appear to deviate from the norm.
As an illustration, here are several examples of LaunchAgents related to mainstream Mac infections: com.pcv.hlpramc.plist, com.updater.mcy.plist, com.avickUpd.plist, and com.msp.agent.plist. If you spot files that don’t belong on the list, go ahead and drag them to the Trash.
- Use the Go to Folder lookup feature again to navigate to the folder named ~/Library/Application Support (note the tilde symbol prepended to the path).
- When the Application Support directory is opened, identify recently generated suspicious folders in it and send them to the Trash. A quick tip is to look for items whose names have nothing to do with Apple products or apps you knowingly installed. A few examples of known-malicious folder names are Quick Mac Fixer and qmfxr.
- Enter ~/Library/LaunchAgents string (don’t forget to include the tilde character) in the Go to Folder search area.
- The system will display LaunchAgents residing in the current user’s Home directory. Look for com.qmfxrhlpr.qmfxrhlpr.plist and drag it suspects to the Trash.
- Type /Library/LaunchDaemons in the Go to Folder search field.
- In the LaunchDaemons path, try to pinpoint the files the malware is using for persistence. Several examples of such items cropped by Mac infections are com.pplauncher.plist, com.startup.plist, and com.ExpertModuleSearchDaemon.plist. Delete the sketchy files immediately.
- Click on the Go menu icon in your Mac’s Finder and select Applications on the list.
- Find the entry for Quick Mac Fixer and move it to the Trash. If this action requires your admin password for confirmation, go ahead and enter it.
- Expand the Apple menu and select System Preferences.
- Proceed to Users & Groups and click on the Login Items tab.
The system will display the list of items launched when the computer is starting up. Locate Quick Mac Fixer or another potentially unwanted app there and click on the “-” (minus) button. - Now select Profiles under System Preferences. Look for a malicious item in the left-hand sidebar. Several examples of configuration profiles created by Mac adware include TechSignalSearch, MainSearchPlatform, AdminPrefs, and Chrome Settings. Select the offending entity and click on the minus sign at the bottom to eliminate it.
If your Mac has been infiltrated by adware, the infection will most likely continue to hold sway over your default web browser even after you remove the underlying application along with its components sprinkled around the system. Use the browser cleanup instructions below to address the remaining consequences of this attack.


Get rid of Quick Mac Fixer virus in web browser on Mac
To begin with, the web browser settings taken over by the Quick Mac Fixer virus should be restored to their default values. Although this will clear most of your customizations, web surfing history, and all temporary data stored by websites, the malicious interference should be terminated likewise. The overview of the steps for completing this procedure is as follows:
- Remove Quick Mac Fixer virus from Safari
- Open the browser and go to Safari menu. Select Preferences in the drop-down list.
- Once the Preferences screen appears, click on the Advanced tab and enable the option saying “Show Develop menu in menu bar”.
- Now that the Develop entry has been added to the Safari menu, expand it and click on Empty Caches.
- Now select History in the Safari menu and click on Clear History in the drop-down list.
- Safari will display a dialog asking you to specify the period of time this action will apply to. Select all history to ensure a maximum effect. Click on the Clear History button to confirm and exit.
- Go back to the Safari Preferences and hit the Privacy tab at the top. Find the option that says Manage Website Data and click on it.
- The browser will display a follow-up screen listing the websites that have stored data about your Internet activities. This dialog additionally includes a brief description of what the removal does: you may be logged out of some services and encounter other changes of website behavior after the procedure. If you’re okay with that, go ahead and click on the Remove All button.
- Restart Safari
- Open the browser and go to Safari menu. Select Preferences in the drop-down list.
- Remove Quick Mac Fixer in Google Chrome
- Open Chrome, click the Customize and control Google Chrome (⁝) icon in the top right-hand part of the window, and select Settings in the drop-down
- When on the Settings pane, select Advanced
- Scroll down to the Reset settings section.
- Confirm the Chrome reset on a dialog that will pop up. When the procedure is completed, relaunch the browser and check it for malware activity.
- Open Chrome, click the Customize and control Google Chrome (⁝) icon in the top right-hand part of the window, and select Settings in the drop-down
- Remove Quick Mac Fixer from Mozilla Firefox
- Open Firefox and go to Help – Troubleshooting Information (or type about:support in the URL bar and press Enter).
- When on the Troubleshooting Information screen, click on the Refresh Firefox button.
- Confirm the intended changes and restart Firefox.
- Open Firefox and go to Help – Troubleshooting Information (or type about:support in the URL bar and press Enter).


Get rid of Quick Mac Fixer virus using Combo Cleaner removal tool
The Mac maintenance and security app called Combo Cleaner is a one-stop tool to detect and remove Quick Mac Fixer virus. This technique has substantial benefits over manual cleanup, because the utility gets hourly virus definition updates and can accurately spot even the newest Mac infections.
Furthermore, the automatic solution will find the core files of the malware deep down the system structure, which might otherwise be a challenge to locate. Here’s a walkthrough to sort out the Quick Mac Fixer issue using Combo Cleaner:
- Download Combo Cleaner installer. When done, double-click the combocleaner.dmg file and follow the prompts to install the tool onto your Mac.
By downloading any applications recommended on this website you agree to our Terms and Conditions and Privacy Policy. The free scanner checks whether your Mac is infected. To get rid of malware, you need to purchase the Premium version of Combo Cleaner.
- Open the app from your Launchpad and let it run the update of malware signature database to make sure it can identify the latest threats.
- Click the Start Combo Scan button to check your Mac for malicious activity as well as performance issues.
- Examine the scan results. If the report says “No Threats”, then you are on the right track with the manual cleaning and can safely proceed to tidy up the web browser that may continue to act up due to the after-effects of the malware attack (see instructions above).
- In case Combo Cleaner has detected malicious code, click the Remove All Threats button and have the utility remove Quick Mac Fixer threat along with any other viruses, PUPs (potentially unwanted programs), or junk files that don’t belong on your Mac.
- Once you have made doubly sure that the malicious app is uninstalled, the browser-level troubleshooting might still be on your to-do list. If your preferred browser is affected, resort to the previous section of this tutorial to revert to hassle-free web surfing.


