If the ThiefQuest ransomware unleashes its weaponized cryptography implementation to pollute a Mac, here’s what to do to remove it and restore affected files.
Taking one’s important files hostage is a long-running stratagem propping a hugely powerful cybercriminal industry, but it’s still a relatively exotic attack vector for the macOS landscape. There are several reasons why Mac ransomware is lagging behind its counterparts targeting PCs and Linux servers. Apple’s operating system minimizes the odds of malicious code slithering its way into computers with little user interaction, making sure every instance of software installation is based on an informed decision rather than a zero-click or suchlike scheme. Furthermore, the smaller user base keeps evil actors’ focus away from deploying file-encrypting threats on a massive scale in this environment. And yet, a number of nasties like KeRanger and Patcher have already paved the way for this phenomenon into the Mac world. The latest one called ThiefQuest seems to take this trend further, but its unorthodox tactic blurs this impression.

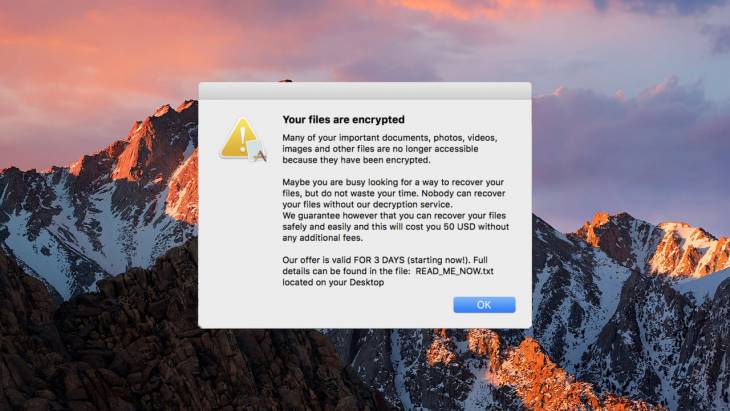
The ransom Trojan in question debuted as EvilQuest in June 2020. This was a researchers-coined name rather than an element of the culprit’s malicious manifestation. Several weeks later, white hats dubbed it ThiefQuest to avoid an association with a popular video game namesake. The new denomination also reflects the gist of the pest more accurately – this aspect will be explained further down. As part of its extortion strategy, the infection drops a rescue note named READ_ME_NOW.txt. The contents of this document let the victim know why the files are no longer accessible and provide the Bitcoin address to send the ransom. A fairly bizarre thing is that the ransom is low compared to the size specified by mainstream data-encrypting parasites. It’s set to $50 worth of BTC.
This unusually small fee is one of the clues indicating that there’s something wrong about the activity of ThiefQuest. Another strange thing is that the Bitcoin address is static, that is to say, it’s the same for every infected Mac user. It means that whoever is in charge of this campaign cannot possibly figure out who has paid the ransom and who hasn’t. This contradicts the wicked principle of ransomware extortion and suggests that the malicious program may have been created for a different purpose. What is the criminals’ motivation then? It could be an attempt to use the infection as a decoy that smokescreens another foul play. This theory gets an extra flavor of plausibility once the obfuscated features of ThiefQuest are analyzed.
The harmful code comes with a backdoor module that allows the attackers to maintain a continued access to the Mac it’s running on. The ransomware also engages a keylogger component that captures everything the victim types on their machine. This information includes, among other things, passwords, cryptocurrency wallet credentials, and credit card numbers. Once the perpetrating app collects this data, it sends it to the Command & Control (C2) server inconspicuously. In the meanwhile, the user’s personal files encrypted with 256-bit Advanced Encryption Standard (AES) cipher stay locked down and there is no chance to get a decryptor from the crooks due to the hard-coded BTC address quirk described above. Under the circumstances, the 72-hour payment deadline mentioned in the READ_ME_NOW.txt ransom note doesn’t make any sense and seems like all bark and no bite. ThiefQuest lives up to its new name because it primarily seeks to steal files rather than earn its operators dirty ransom profit.
This ransomware is propagating via trojanized versions of popular applications available on torrent resources. A few programs that ThiefQuest comes bundled with are the Little Snitch firewall utility, the Ableton audio content editing tool, and the Mixed In Key DJ mixing app. Interestingly, the infection workflow includes a series of confirmation dialogs that the would-be victim needs to click on. In other words, it’s not that easy to get infected. This doesn’t really prevent the ransomware from infiltrating numerous Macs, though. Those infected should blame the issue on their lack of vigilance and a headlong craving for freebies. Anyway, if the attack has taken place and ThiefQuest has encrypted the greater part of valuable data on a Mac, the steps below should lend the victim a helping hand. Keep in mind that ransomware removal should precede data recovery attempts; otherwise re-encryption is imminent.
ThiefQuest ransomware manual removal for Mac
The steps listed below will walk you through the removal of this malicious application. Be sure to follow the instructions in the specified order.
- Expand the Go menu in your Mac’s Finder bar and select Utilities as shown below.

- Locate the Activity Monitor icon on the Utilities screen and double-click on it.
- In the Activity Monitor app, look for questd or another process that appears suspicious. To narrow down your search, focus on unfamiliar resource-intensive entries on the list. Keep in mind that its name isn’t necessarily related to the way the threat is manifesting itself, so you’ll need to trust your own judgement. If you pinpoint the culprit, select it and click on the Stop icon in the upper left-hand corner of the screen.
- When a follow-up dialog pops up asking if you are sure you want to quit the troublemaking process, select the Force Quit option.
- Click on the Go menu icon in the Finder again and select Go to Folder. You can as well use the Command-Shift-G keyboard shortcut.
- Type /Library/LaunchAgents in the folder search dialog and click on the Go button.
- Examine the contents of the LaunchAgents folder for dubious-looking items. Be advised that the names of files spawned by malware may give no clear clues that they are malicious, so you should look for recently added entities that appear to deviate from the norm.
As an illustration, here are several examples of LaunchAgents related to mainstream Mac infections: com.pcv.hlpramc.plist, com.updater.mcy.plist, com.avickUpd.plist, and com.msp.agent.plist. If you spot files that don’t belong on the list, go ahead and drag them to the Trash.
- Use the Go to Folder lookup feature again to navigate to the folder named ~/Library/Application Support (note the tilde symbol prepended to the path).
- When the Application Support directory is opened, identify recently generated suspicious folders in it and send them to the Trash. A quick tip is to look for items whose names have nothing to do with Apple products or apps you knowingly installed. A few examples of known-malicious folder names are AppQuest, LinkBranch, SystemSpecial, and IdeaShared.
- Enter ~/Library/LaunchAgents string (don’t forget to include the tilde character) in the Go to Folder search area.
- The system will display LaunchAgents residing in the current user’s Home directory. Look for com.apple.questd.plist or other dodgy items related to ThiefQuest ransomware (see logic highlighted in subsections above) and drag the suspects to the Trash.
- Type /Library/LaunchDaemons in the Go to Folder search field.
- In the LaunchDaemons path, try to pinpoint the files the malware is using for persistence. Several examples of such items cropped by Mac infections are com.apple.questd.plist, com.startup.plist, and com.ExpertModuleSearchDaemon.plist. Delete the sketchy files immediately.
- Click on the Go menu icon in your Mac’s Finder and select Applications on the list.
- Find the entry for AppQuest or another app that clearly doesn’t belong there and move it to the Trash. If this action requires your admin password for confirmation, go ahead and enter it.
- Expand the Apple menu and select System Preferences.
- Proceed to Users & Groups and click on the Login Items tab.
The system will display the list of items launched when the computer is starting up. Locate AppQuest or another potentially unwanted app there and click on the “-” (minus) button. - Now select Profiles under System Preferences. Look for a malicious item in the left-hand sidebar. Several examples of configuration profiles created by Mac adware include TechSignalSearch, MainSearchPlatform, AdminPrefs, and Chrome Settings. Select the offending entity and click on the minus sign at the bottom to eliminate it.
If your Mac has been infiltrated by adware, the infection will most likely continue to hold sway over your default web browser even after you remove the underlying application along with its components sprinkled around the system. Use the browser cleanup instructions below to address the remaining consequences of this attack.


Restore files encrypted by ThiefQuest Mac ransomware
- The only way to get your data back is to restore it from a previously made backup. Since ThiefQuest acts as a wiper rather than a classic Mac ransom Trojan, paying the ransom isn’t going to get you anywhere with your recovery efforts. Therefore, if you have been prudent enough to maintain backups of your important files, the following steps will help you out in this regard:
- Expand the Go pull-down menu in your Finder and select Utilities.
- Find Migration Assistant and double-click on it.
- Click Continue.
- A follow-up screen will ask how you’d like to transfer your information. Select the option that says “From a Mac, Time Machine backup, or startup disk” and click Continue.
- Select the appropriate Time Machine backup you previously made and click Continue once again.
- Specify what information you want to transfer and hit Continue to start the process. Be advised it may take hours, depending on the amount of data being restored. So, be patient and take your time – the result is worth it. You will regain access to your valuable files.


It’s important to keep in mind that you should only get down to file recovery after the ThiefQuest ransomware has been completely eradicated from your Mac. Otherwise, the malicious application will re-encrypt your data. In case the above manual removal steps weren’t effective enough, proceed to the following section to purge the threat for good.
Get rid of ThiefQuest ransomware using Combo Cleaner removal tool
The Mac maintenance and security app called Combo Cleaner is a one-stop tool to detect and remove ThiefQuest virus. This technique has substantial benefits over manual cleanup, because the utility gets hourly virus definition updates and can accurately spot even the newest Mac infections.
Furthermore, the automatic solution will find the core files of the malware deep down the system structure, which might otherwise be a challenge to locate. Here’s a walkthrough to sort out the ThiefQuest issue using Combo Cleaner:
- Download Combo Cleaner installer. When done, double-click the combocleaner.dmg file and follow the prompts to install the tool onto your Mac.
By downloading any applications recommended on this website you agree to our Terms and Conditions and Privacy Policy. The free scanner checks whether your Mac is infected. To get rid of malware, you need to purchase the Premium version of Combo Cleaner.
- Open the app from your Launchpad and let it run the update of malware signature database to make sure it can identify the latest threats.
- Click the Start Combo Scan button to check your Mac for malicious activity as well as performance issues.
- Examine the scan results. If the report says “No Threats”, then you are on the right track with the manual cleaning and can safely proceed to tidy up the web browser that may continue to act up due to the after-effects of the malware attack (see instructions above).
- In case Combo Cleaner has detected malicious code, click the Remove Selected Items button and have the utility remove ThiefQuest threat along with any other viruses, PUPs (potentially unwanted programs), or junk files that don’t belong on your Mac.
- Once you have made doubly sure that the malicious app is uninstalled, data recovery is still on your to-do list. Resort to the previous section of this tutorial to get your files back – as long as you have been making backups with Time Machine.


