Get rid of misleading Apple Warning Alert popups that wrongly report malicious pornographic spyware or riskware to defraud Mac users.
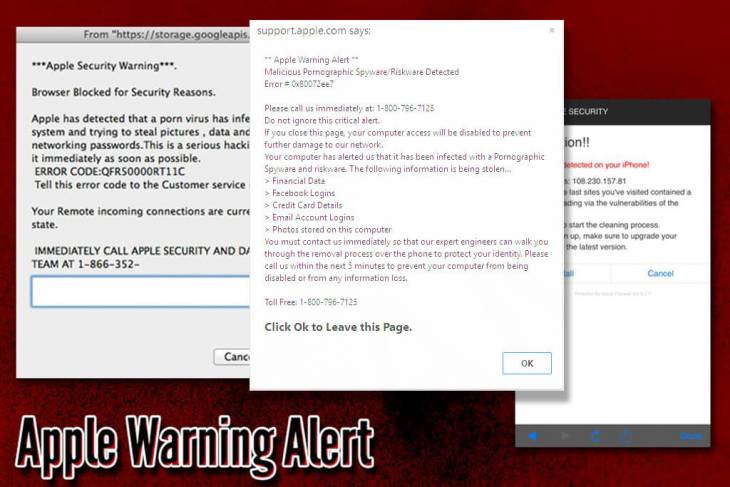
The fake Apple Warning Alert is a growingly common way for scammers to get Mac users on their hook. This concocted error comes in the form of a popup appearing on a malicious website impersonating the official Apple Support page. To impose extra pressure and add a hue of legitimacy, it says “Malicious Pornographic Spyware/Riskware Detected” and includes an error code as purportedly documented by the vendor, namely 0x80072ee7. The spoofed notification additionally lists the types of personal information that’s being stolen by the piece of malware allegedly spotted inside the Mac computer. These include financial data, Facebook logins, credit card details, email credentials, and the victim’s images. The purpose of specifying the presumable targets of the pseudo-infection is to urge the user to plunge headlong into taking action, which boils down to calling a support agent who’s a fraudster in disguise.

Whereas the scam implications of the bogus Apple Warning Alert are obvious, it is just the tip of the iceberg. The right question to ask in terms of security is, how do Mac users visit the faux support page? This is, clearly, not a matter of an informed decision because it’s in nobody’s interest to repeatedly go to a fraudulent site. It turns out that this campaign relies on an auxiliary digital threat that hijacks the victim’s default web browser and reorganizes its preferences to force hits to the unwanted source. Categorized as adware or PUA (potentially unwanted application), this culprit crops up on a Mac by means of an installation bundle that keeps the user focused on the core benign software while omitting information about the accompanying apps. The threat underlying the Apple Warning Alert hoax lurks among these extra components deliberately concealed by the installer. The most effective way to avoid this plot is to deselect the ‘Recommended’ mode and read the fine print that should disclose the real structure of the package.
As soon as the adware is up and running on a Mac, it follows a multi-pronged tactic to establish persistence, escalate its privileges, and turn the victim’s web surfing defaults upside down. Speaking of the obstinacy facet of this activity, the pest injects a malicious entry into the device profiles list. This interference is key to controlling certain Internet navigation settings and preventing the admin from reverting to the correct ones. The targeted browser undergoes a few game-changing tweaks, with its homepage, preferred search engine, and new tab URL being replaced with that of the tech support scam page. The apparent upshot of this tampering is that Safari, Chrome, or Firefox will be incessantly forwarded to the site hosting the fake Apple Warning Alert popup. The landing page feigns legitimacy by incorporating some Apple branding elements, including the company logo and the design of the authentic support.apple.com resource.
The scare tactic revolving around a fake instance of spyware/riskware detection is enhanced by the following fishy statement, “If you close this page, your computer access will be disabled to prevent further damage to our network”. In addition to this, the Apple Warning Alert popup conveys an element of urgency by specifying a five-minute deadline to fix the problem. This brings us to the pivot point of this fraud – the malefactors instruct the Mac user to give them a phone call “for support”. The toll-free number, 1-800-796-7125, is literally sprinkled all over the page and the popup itself. What happens if the victim dials it is that a self-proclaimed support representative on the other end will dramatize the risk and offer assistance that presupposes payment. At the end of the day, this technique is like selling bottled air because the scammers want a fee for fixing a security issue that’s not there. If these redirects are underway, the most reasonable response is to purge the adware that has executed the browser hijack leading to the deceptive alerts.
Apple Warning Alert virus manual removal for Mac
The steps listed below will walk you through the removal of this malicious application. Be sure to follow the instructions in the order specified.
- Open up the Utilities folder as shown below

- Locate the Activity Monitor icon on the screen and double-click on it
- Under Activity Monitor, find a process that looks out of place, select it and click Quit Process
- A dialog should pop up, asking if you are sure you would like to quit the troublemaking process. Select the Force Quit option
- Click the Go button again, but this time select Applications on the list. Find a suspicious entry on the interface, right-click on it and select Move to Trash. If user password is required, go ahead and enter it
- Now go to Apple Menu and pick the System Preferences option
- Select Accounts and click the Login Items button. The system will come up with the list of the items that launch when the box is started up. Locate the potentially unwanted object there and click on the “-“ button


Get rid of Apple Warning Alert virus in web browser on Mac
To begin with, the web browser settings taken over by the Apple Warning Alert virus should be restored to their default values. Although this will clear most of your customizations, web surfing history, and all temporary data stored by websites, the malicious interference should be terminated likewise. The overview of the steps for completing this procedure is as follows:
- Remove Apple Warning Alert virus from Safari
- Open the browser and go to Safari menu. Select Preferences in the drop-down list.
- Once the Preferences screen appears, click on the Advanced tab and enable the option saying “Show Develop menu in menu bar”.
- Now that the Develop entry has been added to the Safari menu, expand it and click on Empty Caches.
- Now select History in the Safari menu and click on Clear History in the drop-down list.
- Safari will display a dialog asking you to specify the period of time this action will apply to. Select all history to ensure a maximum effect. Click on the Clear History button to confirm and exit.
- Go back to the Safari Preferences and hit the Privacy tab at the top. Find the option that says Manage Website Data and click on it.
- The browser will display a follow-up screen listing the websites that have stored data about your Internet activities. This dialog additionally includes a brief description of what the removal does: you may be logged out of some services and encounter other changes of website behavior after the procedure. If you’re okay with that, go ahead and click on the Remove All button.
- Restart Safari
- Open the browser and go to Safari menu. Select Preferences in the drop-down list.
- Remove Apple Warning Alert in Google Chrome
- Open Chrome, click the Customize and control Google Chrome (⁝) icon in the top right-hand part of the window, and select Settings in the drop-down
- When on the Settings pane, select Advanced
- Scroll down to the Reset settings section.
- Confirm the Chrome reset on a dialog that will pop up. When the procedure is completed, relaunch the browser and check it for malware activity.
- Open Chrome, click the Customize and control Google Chrome (⁝) icon in the top right-hand part of the window, and select Settings in the drop-down
- Remove Apple Warning Alert from Mozilla Firefox
- Open Firefox and go to Help – Troubleshooting Information (or type about:support in the URL bar and press Enter).
- When on the Troubleshooting Information screen, click on the Refresh Firefox button.
- Confirm the intended changes and restart Firefox.
- Open Firefox and go to Help – Troubleshooting Information (or type about:support in the URL bar and press Enter).


Get rid of Apple Warning Alert popups using Combo Cleaner removal tool
The Mac maintenance and security app called Combo Cleaner is a one-stop tool to detect and remove Apple Warning Alert virus. This technique has substantial benefits over manual cleanup, because the utility gets hourly virus definition updates and can accurately spot even the newest Mac infections.
Furthermore, the automatic solution will find the core files of the malware deep down the system structure, which might otherwise be a challenge to locate. Here’s a walkthrough to sort out the Apple Warning Alert issue using Combo Cleaner:
- Download Combo Cleaner installer. When done, double-click the combocleaner.dmg file and follow the prompts to install the tool onto your Mac.
By downloading any applications recommended on this website you agree to our Terms and Conditions and Privacy Policy. The free scanner checks whether your Mac is infected. To get rid of malware, you need to purchase the Premium version of Combo Cleaner.
- Open the app from your Launchpad and let it run an update of the malware signature database to make sure it can identify the latest threats.
- Click the Start Combo Scan button to check your Mac for malicious activity as well as performance issues.
- Examine the scan results. If the report says “No Threats”, then you are on the right track with the manual cleaning and can safely proceed to tidy up the web browser that may continue to act up due to the after-effects of the malware attack (see instructions above).
- In case Combo Cleaner has detected malicious code, click the Remove Selected Items button and have the utility remove Apple Warning Alert threat along with any other viruses, PUPs (potentially unwanted programs), or junk files that don’t belong on your Mac.
- Once you have made doubly sure that the malicious app is uninstalled, the browser-level troubleshooting might still be on your to-do list. If your preferred browser is affected, resort to the previous section of this tutorial to revert to hassle-free web surfing.


